Integrating a Custom Tool in MERLIC
To ensure that your custom tool is available in MERLIC, you have to add the location of your custom tool to the MERLIC settings. This can be done by adding the respective tool path in the MERLIC preferences dialog. Alternatively, you can add the respective tool path to the "MERLIC5.ini" file. If you are using a different .ini file for MERLIC, you have to add the path to the respective .ini file that is used. As soon as the tool path has been added, you can restart MERLIC. Then, your custom tool will be available in the Tool Library.
Setting the Tool Path in MERLIC
A custom MERLIC tool is implemented via an HDevelop procedure as described in the topic Implementing a Custom Tool with HALCON in HDevelop. Therefore, adding the tool path corresponds to adding the path in which the respective procedure has been stored. It is also possible to add multiple tool paths if your custom tools are stored in different locations.
Adding the Path for a Custom Tool in MERLIC
- Open the MERLIC "Preferences" dialog in the MERLIC Creator using the menu entry "Edit → Preferences".
- Open the tab "Custom Tools".
- In the category "Path Settings", click on the
 button on the right of the "Tool paths" area to open the file selection dialog.
 - Select the directory in which the custom tool, i.e., the respective HDevelop procedure, is located. If you have multiple custom tools in different locations, make sure to add the paths to all custom tools that should be available in MERLIC. If you would like to edit or delete one of the added file paths, you need to double-click the path before editing or deleting it.
- If your custom tool requires functionality that has been implemented in a separate HDevelop procedure, you have to add the path to this procedure to the list of "Additional procedure path". Usually, these are custom procedures that contain functionality which is used in multiple custom tools and has therefore been stored in a separate procedure to avoid implementing the same functionality multiple times.
This option is intended only for custom HDevelop procedures which provide functionality that is required when using the tool in MERLIC. It is not intended for any other types of procedures such as help procedures which are required only for the implementation of custom tools. The help procedures that are provided with the MERLIC installation for the development of custom tools, within the subdirectory "\examples\tool_development\procedures", must not be added to the additional procedure list in the MERLIC settings.
- Click the "Save" button to confirm your selection and restart MERLIC to apply the new tool path settings.

Adding the Path for a Custom Tool in the .ini File
You can also add the path to your custom tool in the "MERLIC5.ini" file. If you are using a different .ini file for MERLIC, you have to add the path to the respective .ini file that is used.
- Open the "MERLIC5.ini" file located in "%APPDATA%\MVTec" or the respective .ini file that is used.
- In the section [General], add the absolute path to the HDevelop procedure representing your custom tool with the property "ToolPath".
Example:
Copy[General]
ToolPath=C:\Program Files\MVTec\MERLIC-26.03\examples\tool_development\tool_templates - If you want to specify multiple tool paths, add the additional paths separated by a semicolon.
Example:
Copy[General]
ToolPath=C:\Program Files\MVTec\MERLIC-26.03\examples\tool_development\tool_templates;C:\Users\Public\Documents\MVTec\MERLIC\Custom_tools[General]
ToolPath=C:\Program Files\MVTec\MERLIC-26.03\examples\tool_development\tool_templates;C:\Users\Public\Documents\MVTec\MERLIC\Custom_tools
On startup of MERLIC Creator and MERLIC RTE, the defined tool paths are searched for files of the following format:
|
File format |
File type |
Description |
|---|---|---|
|
.mvtool |
MERLIC tools |
These type of files represent the tools provided by MERLIC. |
|
.hdpl |
HDevelop procedure libraries |
These type of files represent custom MERLIC tools that have been created. |
|
.hdvp |
HDevelop procedures |
These type of files represent basic custom tools that consist of only one procedure. This type of custom tool does not contain any of the auxiliary MERLIC procedures that can be added to the "Procedures" paths of HDevelop. |
All files with these formats are loaded and integrated in MERLIC as tools. The communication between MERLIC and the tool takes place via the input and output parameters of their HDevelop procedures.
Using the Custom Tool in MERLIC
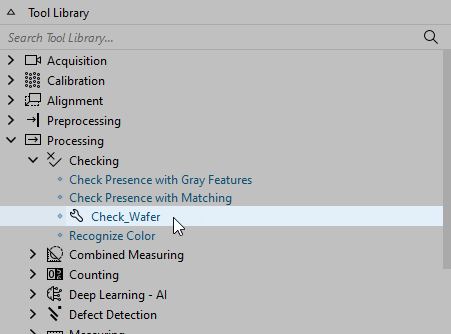
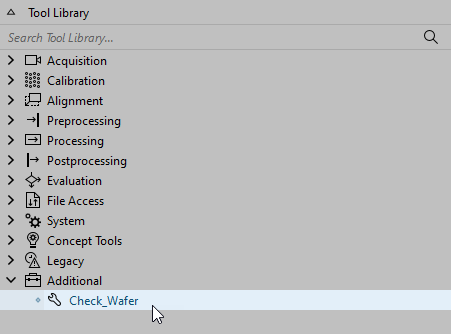
After setting the tool path of MERLIC to include the location of your custom tool, i.e., the respective HDevelop procedure library, you can start using your custom tool in the MERLIC Creator. The new tool will be available in the Tool Library in the tool category that has been defined in the procedure settings. In case, no tool library has been specified, it will be placed in the category "Additional". In the Tool Library, you can recognize new tool categories for custom tools by the icon  . This icon is also assigned to custom tools in the Tool Flow panel.
In the example images below, you can see our example custom tool in different tool categories. In case of the left image, we defined the existing tool category "Processing → Checking" in the respective procedure settings whereas in case of the right image, we defined no tool category.
You can now add your custom tool to your MERLIC Vision App and Add the tool and use it in your application.


