Detect Anomalies in the Global Context
Use this tool to detect structural and logical anomalies in images. Structural anomalies include unknown features such as scratches, cracks, or contamination. Logical anomalies violate constraints regarding the image content such as a wrong number or a wrong position of an object in an image.
This tool differs from the tool "Detect Anomalies" in that it finds both structural and logical anomalies on a larger scale and uses a deep learning model. However, the deep learning model must be trained with a large data set.
If no trained deep learning model is available yet, you first have to train one with the MVTec Deep Learning Tool. While it is also possible to use MVTec HALCON to train the deep learning model, it is recommended to use the MVTec Deep Learning Tool.
When training the deep learning model, it can help to use training images with "bad" samples, i.e., images that show anomalies. However, this is not required.
The trained deep learning model for anomaly detection in the global context can consist of one or two subnetworks:
- Local subnetwork
The local subnetwork is used to detect anomalies that affect the image on a smaller, local scale. It is designed to detect structural anomalies but can find logical anomalies as well. Thus, if an anomaly can be recognized by analyzing single patches of an image, it is detected by the local component of the model. An example for a structural anomaly on a local scale could be the external contamination of a juice bottle.
- Global subnetwork
The global subnetwork is used to detect anomalies that affect the image on a larger, global scale. It is designed to detect logical anomalies but can find structural anomalies as well. Thus, if you need to see most or all of an image to recognize an anomaly, it is detected by the global component of the model. An example for a logical anomaly on a global scale could be an orange juice bottle labeled as apple juice.
When training the deep learning model, it is possible to define internal data, i.e., a region and/or a threshold, that restrict the deep learning model's search for anomalies. The region defines a specific area in the image. The threshold however, defines which properties, e.g., minimum number of interconnected pixels or anomaly score, an anomaly must fulfill in order to be perceived as an anomaly. You can choose which internal data to use by setting the parameter "Use Internal Data of Model". Both the region and the threshold can also be set manually in the MVApp. Find out more in the section Basic Parameters under "Use Internal Data of Model".
Support of Artificial Intelligence Acceleration Interfaces (AI²)
MERLIC comes with Artificial Intelligence Acceleration Interfaces (AI²) for the NVIDIA® TensorRT™ SDK and the Intel® Distribution of OpenVINO™ toolkit. Thus, you can use AI accelerator hardware as processing unit that is compatible with the NVIDIA® TensorRT™ or the OpenVINO™ toolkit to perform optimized inference on the respective hardware, e.g., NVIDIA® GPUs or hardware supporting the OpenVINO™ toolkit such as CPUs, Intel® GPUs, and Movidius™ VPUs. This way, you can achieve significantly faster deep learning inference times. The respective hardware can be selected at the tool parameter "Processing Unit".
Prerequisites
NVIDIA® GPUs and CPUs with support of the OpenVINO™ toolkit can be used immediately after the installation of MERLIC. There is no additional installation or setup required.
To use Intel® GPUs and VPUs with the OpenVINO™ toolkit as processing unit, the following prerequisites apply:
- You first have to install the Intel® Distribution of OpenVINO™ toolkit.
- You have to start MERLIC in an OpenVINO™ toolkit environment.
For more detailed information on the installation and the prerequisites, see the topic AI² Interfaces for Tools with Deep Learning.
Parameters
Basic Parameters
Image:
This parameter represents the image in which anomalies should be detected.
ROI:
This parameter defines the region of interest (ROI) for processing. By default the ROI is defined as an empty ROI. If you want to use a non-empty ROI for the processing, you either have to connect the parameter to an appropriate ROI result of a previous tool or you have to draw new ROIs into the image using the available ROI buttons.
Model File:
This parameter defines the HALCON deep learning model (.hdl file format), that should be used for detecting anomalies. Per default, no model is defined. However, it is necessary to define a deep learning model to use this tool.
While it is also possible to use MVTec HALCON to train the object detection model, it is recommended to use the MVTec Deep Learning Tool.
This tool only supports deep learning models that were trained with the default values for the following preprocessing parameters:
- NormalizationType = "none"
- DomainHandling = "full_domain"
Use Internal Data of Model:
This parameter defines which data from the deep learning model is used to detect anomalies in the images. By default, the parameter value is set to "all". However, there are four possibilities to choose from:
|
Value |
Description |
|---|---|
|
all |
All of the data determined by the deep learning model is used to detect anomalies. If this value is selected, internal data is transferred to the parameters "Anomaly Region Threshold", "Anomaly Score Threshold", "Anomaly Score Tolerance", and "Minimum Defect Area". Therefore these parameters cannot be edited and are grayed out. If this value is selected, it is also not possible to use a manually drawn ROI to restrict the area in which the deep learning model detects anomalies. |
|
thresholds |
Only the thresholds determined by the deep learning model are used to detect anomalies. If this value is selected, internal data is transferred to the parameters "Anomaly Region Threshold", "Anomaly Score Threshold", "Anomaly Score Tolerance", and "Minimum Defect Area". Therefore these parameters cannot be edited and are grayed out. |
|
regions |
Only the regions determined by the deep learning model are used to detect anomalies. If this value is selected, it is not possible to use a manually drawn ROI to restrict the area in which the deep learning model detects anomalies. |
|
none |
None of the data determined by the deep learning model is used to detect anomalies. Thus it is necessary to manually define either thresholds, an ROI, or both. |
If the trained deep learning model has not defined values for either one of the parameters "Anomaly Region Threshold", "Anomaly Score Threshold", "Anomaly Score Tolerance", or "Minimum Defect Area" and either the value "all" or the value "thresholds" is set in the parameter "Use Internal Data of Model", MERLIC will insert default values for the missing parameter value.
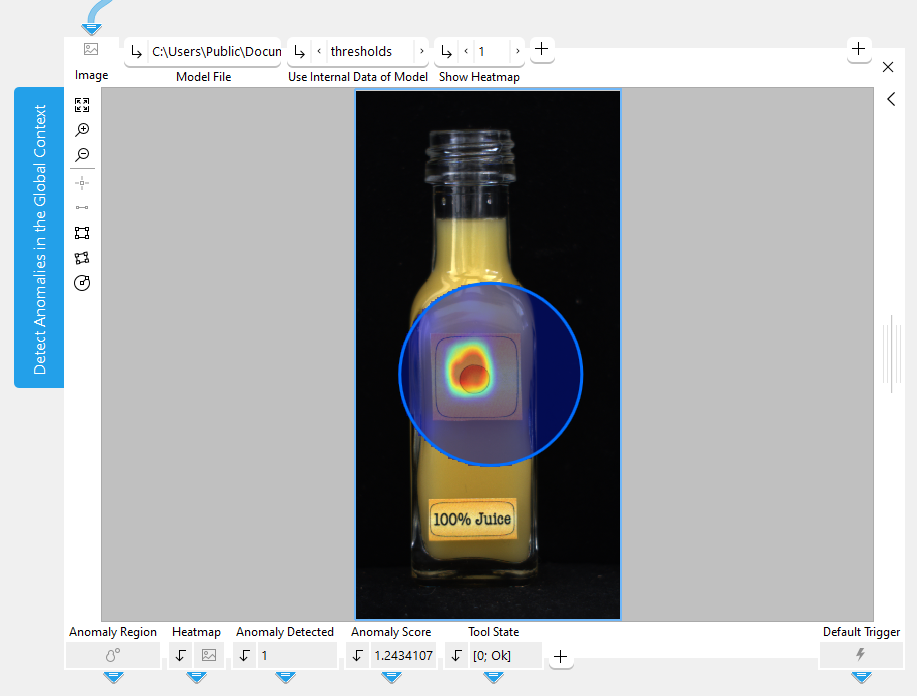
Show Heatmap:
This parameters defines if the heatmap is shown or not. The heatmap visually indicates the anomalies in the image. The default setting is 1. This means that the heatmap is shown by default. If the parameter is set to 0, the heatmap is not visible. The value of this parameter also determines if the heatmap is part of the image that is returned in the result "Displayed Image".
Additional Parameters
Anomaly Region Threshold:
This parameter defines at which threshold value a pixel in the image belongs to an anomaly or not. The parameter is set to 0.5 by default. The optimal threshold is determined during the training. However, if the threshold set by the deep learning model is not optimal, this parameter allows some fine tuning.
Anomaly Score Threshold:
This parameter defines at which threshold value the image is counted as an anomaly image or not. The parameter is set to 0.5 by default. The optimal threshold is determined during the training. However, if the threshold set by the deep learning model is not optimal, this parameter allows some fine tuning.
If the result "Anomaly Score" is greater than the value that is set in the parameter "Anomaly Score Threshold", the result "Anomaly Detected" is set to 1.
Anomaly Score Tolerance:
This parameter defines which percentage of outliers should be left out of the calculation of the anomaly score. The parameter is set to 0.0 by default. The value 1 refers to 100 percent. Changing this value will change the anomaly score of your images. Usually, it is not necessary to adjust this parameter.
Minimum Defect Area:
This parameter defines the minimum number of interconnected pixels needed to be considered an anomaly. Changing the value of this parameter can have an impact on the anomaly score.
Subnetwork:
This parameter defines which subnetwork the deep learning model is using to detect anomalies. By default, the parameter value is set to "all". Reducing the deep learning model to one subnetwork can improve the runtime and memory consumption of your MVApp. However, reducing the deep learning model to one subnetwork can also change what is detected as an anomaly.
|
Value |
Description |
|---|---|
|
all |
The deep learning model uses both the local and the global subnetwork to detect anomalies. |
|
local |
The deep learning model uses the local subnetwork to detect anomalies that affect the image on a smaller, local scale. Choose the local network if an anomaly can be recognized by analyzing single patches of an image. The local subnetwork favors the detection of structural anomalies, however, it can also recognize logical anomalies. |
|
global |
The deep learning model uses the global subnetwork to detect anomalies that affect the image on a larger, global scale. Choose the global network if an anomaly can be recognized by analyzing most or all of an image. The global subnetwork favors the detection of logical anomalies, however, it can also recognize structural anomalies. |
Processing Unit:
This parameter defines the device used for processing the images. The parameter is set to "auto" by default. In this mode, MERLIC tries to choose a suitable GPU as processing unit because it usually performs better than the CPU. The fallback for the auto mode is your CPU. However, you can also choose the processing unit manually. Click on the parameter to select the device from the list of all available processing units.
MERLIC also supports the use of AI accelerator hardware that is compatible with the NVIDIA® TensorRT™ SDK or the OpenVINO™ toolkit:
- NVIDIA® GPUs
- CPUs, Intel® GPUs, Intel® VPUs (MYRIAD and HDDL) with support of the OpenVINO™ toolkit
The respective devices are marked either with the prefix "TensorRT(TM)" or "OpenVINO(TM)". If you select a device that supports NVIDIA® TensorRT™ or the OpenVINO™ toolkit, the memory will be initialized on the device via the respective plug-in for the AI² interface.
As soon as an AI accelerator hardware has been selected as processing unit, the optimization of the deep learning model is started. After the optimization, all parameters that represent model parameters will be internally set to read-only. Thus, their values cannot be changed anymore as long as the selected AI accelerator is used as processing unit. To change the parameters, you first have to change the processing unit to a different one without any AI acceleration. After setting the parameters, you can set the processing unit back to the respective AI accelerator hardware.
CPUs with support of the OpenVINO™ toolkit can be used without any additional installation steps. They will be automatically available in the list of available processing units. If multiple processing units with the same name are available, an index number is assigned to their name. The same applies to GPUs with support of the NVIDIA® TensorRT™.
To use GPUs and VPUs with the support of the OpenVINO™ toolkit as processing unit, the Intel® Distribution of OpenVINO™ toolkit must be installed on your computer and MERLIC must be started in an OpenVINO™ toolkit environment. See the topic AI² Interfaces for Tools with Deep Learning for more detailed information on the prerequisites.
Precision:
This parameter defines the data type that is used internally for the optimization of the deep learning model for inference, i.e., it defines the precision to which the model is converted to. It is set to "high" by default.
The following table shows the model precisions which are supported in this tool.
|
Value |
Description |
|---|---|
|
high |
The deep learning model is converted to a precision of "float32". |
|
medium |
The deep learning model is converted to a precision of "float16". |
Most processing units support both types of precisions. However, there might be some processing units that support only one of these precisions. In this case, only the supported precision will be available at the parameter as soon as the respective device has been selected at the parameter "Processing Unit". If the processing unit is selected automatically, i.e., if "Processing Unit" is set to "auto", only the precision "high" is available.
Results
Basic Results
Anomaly Region:
This result represents the region consisting of all the pixels that are regarded as an anomaly.
Anomaly Detected:
This results indicates whether the image contains an anomaly or not. The result value is 1 if the image contains an anomaly. Otherwise, the result value is 0.
Anomaly Score:
This result indicates how likely the entire image is to contain an anomaly.
Tool State:
"Tool State" returns information about the state of the tool and thus can be used for error handling. Please see the topic Tool State Result for more information about the different tool state results.
Additional Results
Used Region:
This result represents the region in which the deep learning model detects anomalies. Usually, this result shows the region that is defined by the deep learning model. However, it is also possible to define an ROI with the tools from the Tool Workspace, which is then returned as a result in this case. If there is neither a region defined in the deep learning model, nor a manually drawn ROI, this result does not return a region.
Heatmap:
This result represents the heatmap as an image which indicates the anomalies visually.
Displayed Image:
This result represents the overlay of the processing image and the anomaly heatmap. As the processing image shows through the heatmap, you can see more clearly what the anomaly is and where it occurs in the image. However, the heatmap is only shown if the parameter "Show Heatmap" is set to 1. If "Show Heatmap" is set to 0 the resulting image returns only processing image without heatmap.
Used Processing Unit:
This result returns the processing unit that was used in the last iteration. You can use this result to check which processing unit was actually used if the parameter "Processing Unit" is set to "auto" or to check that the correct one was used.
Precision Data Type:
This result returns the data type that was used internally for the optimization of the deep learning model for inference. You can use this result to check if the correct precision was used in case any problems occur.
If the parameter "Precision" is set to "high", the deep learning model should be converted to a precision of "float32". Therefore, this result is expected to return the data type "float32". If the parameter "Precision" is set to "medium", the deep learning model should be converted to a precision of "float16". In this case, the expected value for this result is the data type "float16". In case any problem occurred during an iteration of your MVApp, you could check if this result returns a different data type than expected and also have a look at the log file for more information. See the topic Logging for more information about the log files.
Processing Time:
This result returns the duration of the most recent execution of the tool in milliseconds. The result is provided as additional result. Therefore, it is hidden by default but it can be displayed via the ![]() button beside the tool results. For more information see the section Processing Time in the tool reference overview.
button beside the tool results. For more information see the section Processing Time in the tool reference overview.
Application Examples
This tool is used in the following MERLIC Vision App examples:
- detect_anomalies_of_bottles_in_the_global_context.mvapp

