Creating and Configuring Groups
MERLIC enables you to combine multiple tools of your MERLIC Vision App (MVApp) in a group. When configuring your MVApp, you might want to use groups to combine tools that perform similar processing tasks, or you might just want to provide a better overview in your MVApp. You can simply select the tools you want to combine and create a group. In the following, you can find information on how to group and ungroup multiple tools, and you can find information on which type of configurations you can perform for a group. If you are using groups in your MVApp, this might also affect the Frontend design of the MVApp. For more information on what to consider when creating a Frontend design for an MVApp with groups, see the topic Adjusting Your Widgets.
To get general information on the visualization of groups and the restrictions on creating groups, see the topic Groups.
Grouping and Ungrouping Tools
MERLIC tools can be grouped and ungrouped in the Tool Flow panel of the MERLIC Creator as described in the following sections.
How to Group Tools
- Select the tools you want to combine in a group in the Tool Flow panel.
- Right-click on the tool selection to open the context menu and select "
 Group". Alternatively, you can use the keyboard shortcut Ctrl+G. If it is not possible to group the selected tools due to restrictions, the context menu entry will be greyed out and the keyboard shortcut will not be available.
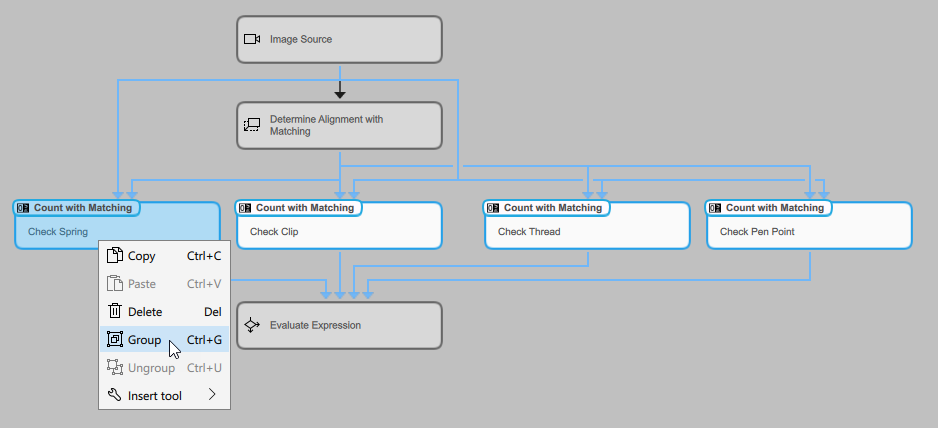
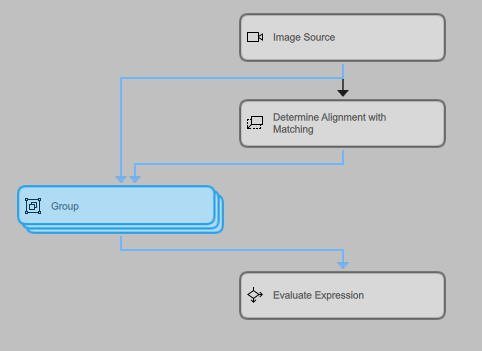
- The selected tools will be replaced in the Tool Flow panel by the new tool group. The group will be inserted at a specific position depending on the selected tools. It is always inserted in the first row of the tool selection at the position where the first tool from the left was placed. In the example image below, this is the position where the tool "Check Spring" was previously placed.
-
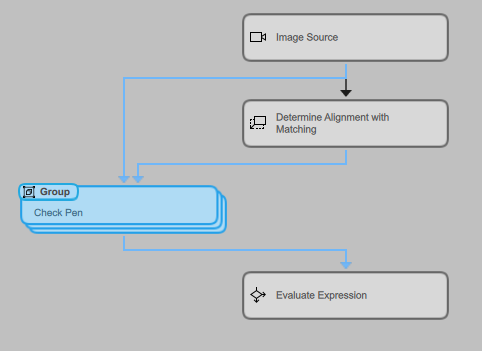
You could now also rename the group in the Tool Workspace just like a regular tool as described in Renaming Tools and Connectors. The group will then be displayed in the Tool Flow panel with the new custom name.
After creating a group, the tools in the group are not visible anymore and you cannot see which tools are contained in this group. If you want to see which tools are contained in a group, you have to ungroup the tools again. Furthermore, it is not possible to add further tools to an existing group. For this, you also have to ungroup the tools first and then group the desired tools again.
In some cases, it is not possible to create a group:
- It is not possible to create a group of groups.
- It is not possible to group tools if more than one "easyTouch Button" in the Frontend design is connected to any of the tools in the group-to-be.
- It is not possible to group tools if more than one "Training" widget in the Frontend design is connected to any of the tools in the group-to-be.
- It is not possible to group tools if any tool connections would be lost when creating the group. For more information, see the section Restrictions in the topic Groups.
How to Ungroup Tools
To ungroup the tools, you can proceed as follows:
- Right-click on the group in the Tool Flow panel to open the context menu and select "
 Ungroup".
 - Alternatively, select the group and use the keyboard shortcut Ctrl+U.

Configuring Groups
There are different types of configurations you can perform on a group.
In the Tool Flow panel, you can move, copy, and delete a group just like a regular tool. When copying a group, all parameters and results that are visualized in the original group will also be copied, but without the respective connections. When deleting a group, all tools within the group will also be deleted, and all existing connections of the deleted tools to Designer widgets in the Frontend design will also be lost. The respective widgets in the Frontend design must be set anew.
In the Tool Workspace, a group will be displayed just like a regular tool, and the available configuration options are also the same. However, in contrast to a regular MERLIC tool, you may see parameters and results that belong to different tools within the group, and the graphic window might not show the image you expect. By default, it shows the image of the tool that has been added last, but if there are other image parameters or image results available at the group, you can display these images in the graphic window by hovering or clicking on the image icon at the respective connector. This way, you can choose which image you want to display when configuring the available parameters in the group.
If your group contains a tool that works with easyTouch and that is connected to an "easyTouch Button" in the Frontend design, you will be able to use the easyTouch feature in the graphic window.
Available Parameters in a Group
A group only shows specific parameters and results in the Tool Workspace:
- Parameters and results that are connected to previous tools or subsequent tools outside of the group.
- Parameters and results that have been added as MVApp parameters and MVApp results before the group was created.
- Parameters and results that are connected in the Frontend design of the MVApp.
The connections to these parameters and results are also shown in the Tool Workspace.
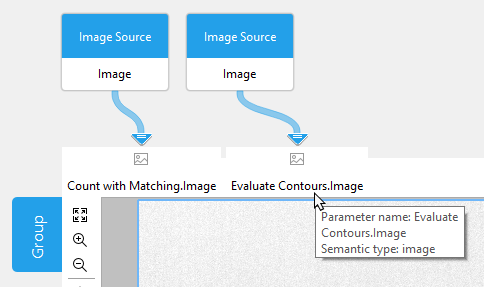
A parameter at a group always shows the name of the respective tool followed by the name of the parameter, e.g., "Count with Matching.Image". This way, you can easily recognize which tool a parameter is assigned to. If there are a lot of parameters available at the group so that their names are not fully visible, you can hover the mouse pointer over a parameter name to see its full name in the tooltip.
The iconic parameters are displayed in a specific order from left to right: images, regions, contours, ROIs, calibration data, alignment data. The iconic parameter at the top left is the one displayed in the graphic window of the group.
Supported Configurations and Restrictions
Basically, you can perform the following configurations for a group in the Tool Workspace:
- Adjusting the values of the available parameters.
- Removing the existing connections from the parameters and creating new connections to tools outside the group.
- Renaming the group.
- Determining parameter settings by using easyTouch. However, easyTouch only works for a group in the Tool Workspace if exactly one tool with easyTouch functionality is connected to an "easyTouch Button" in the Frontend design.
- Performing a training. However, trainings can only be performed within the group in the Tool Workspace if exactly one tool with training functionality is connected to a "Training" widget in the Frontend design.
All these configurations are the same as for regular MERLIC tools. However, there also some restrictions when configuring a group in the Tool Workspace:
- It is not possible to add new input or output triggers to a group.
- It is not possible to add new parameters to a group.
- It is not possible to determine parameter settings by using easyTouch in the Tool Workspace if no tool with easyTouch functionality within the group is connected to an "easyTouch Button" in the Frontend design.
- It is not possible to perform a training in the Tool Workspace if no tool with training functionality within the group is connected to a "Training" widget in the Frontend design.
- When configuring a group in the Tool Workspace, no processing time is provided.
Adjusting Parameters at a Group
If a parameter is available for a group, you can use almost the same modification options that would be possible at the connector if the respective tool were displayed in the Tool Workspace. If the parameter is connected to a result of a previous tool outside the group, you can remove the connection and connect a different result. If the parameter provides editing options, you can adjust the value manually at the connector. However, easyTouch is only supported when configuring parameters at a group if the respective tool with easyTouch functionality is connected to an "easyTouch Button" in the Frontend design.
Depending on the tools in the group, it might also be possible to draw an ROI into the image using the available ROI buttons. If a tool in the group provides an ROI parameter which is connected in the Frontend design, the respective ROI button is also active and available for use in group. When drawing an ROI, the ROI is applied automatically in the corresponding tool in the group. For more detailed information on the modification options at a connector, see the section Using the Connector in the topic Adjusting Parameters.
Keep in mind that a group does not show all parameters of the tools in the group but only those which meet the conditions listed above in the section Available Parameters in a Group. If you want to adjust parameters that are not available at the group, you have to ungroup the tools and adjust the parameters in the Tool Board of the respective tools. Afterward, you can group the tools again. This might be cumbersome if you need to make frequent changes at a specific parameter that is not available in the Tool Workspace after grouping the tools. In this case, you can use a workaround to make a parameter available at the group:
- Ungroup the tools and select the respective tool to show its Tool Board in the Tool Workspace.
- Add the desired parameter to the MVApp parameters by clicking on the
 icon. As soon as the parameter is set as MVApp parameter, the respective icon is highlighted in green .
 - Group the tools again. The parameter is now available at the group but it is still in the list of MVApp parameters. To remove it from the MVApp parameters, follow the next step.
- Right-click on the parameter and select "Remove from MVApp parameters" from the context menu.
In the following example image, we used this workaround to make the first three parameters available for editing at the group.

Even if the parameters have been removed again from the list of MVApp parameters, they are still available at the group. Thus, it is now possible to adjust the parameters directly at the group.
If a warning or an error occurs in any of the tools in the group, the respective icon is displayed at the group. You can check the information and adjust the configuration accordingly to fix the problem.

