
Review of acquisition modes
For simplicity, we will use GenICam terminology here, which applies to GenICam compliant devices such as USB3 Vision and GigE Vision cameras. A few important parameters are summarized in Table 1. For a complete overview of all GenICam (including all GenTL) parameters, please refer to [1] and [2].
| Parameter | Values | Default |
|---|---|---|
| AcquisitionMode | [Continuous, SingleFrame, MultiFrame] | Continuous |
| TriggerSelector | [FrameStart, ...] | |
| TriggerMode | [On, Off] | |
| TriggerSource | [Software, Line1, ...] | |
| [Stream]StreamBufferHandlingMode | [OldestFirst, OldestFirstOverwrite, NewestOnly] | OldestFirst |
Table 1
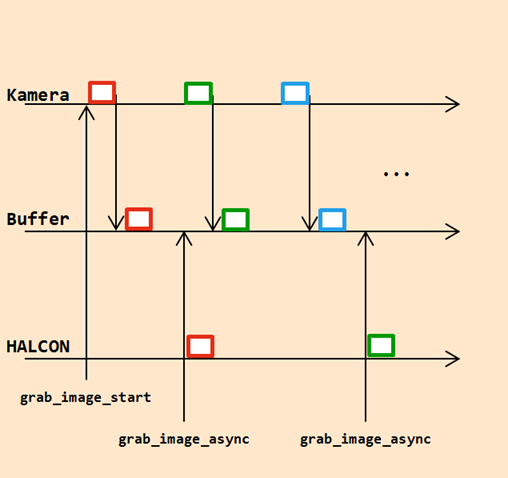
The AcquisitionMode mainly controls the number of frames captured in the acquisition. For most cameras, "Continuous" is the default mode. In this mode, the camera will start acquiring one image after the other as soon as the HALCON operator grab_image_start is executed (Figure 1). The images will be queued in a buffer and can then be grabbed using grab_image_async. This approach ensures that images are acquired as fast as possible. The [Stream]StreamBufferHandlingMode controls which of the images in the buffer queue will be grabbed with grab_image_async. "Grabbed" means that the user will obtain the image as a HALCON iconic object.
Another common use case is the triggered acquisition. This should also be implemented using grab_image_async. When the camera is in "Continuous" mode and TriggerMode is set to "On", the camera is ready to acquire an image once grab_image_start is called. As soon as the trigger signal is received, the camera will acquire an image and push it to the buffer queue (Figure 2). Again, the image can then be grabbed from the queue using grab_image_async. Via the parameter TriggerSource, either a software or a hardware trigger can be selected. The software trigger mode is basically equivalent to a synchronous grab. This code snippet demonstrates how a software triggered acquisition can be set up:
open_framegrabber (...)
set_framegrabber_param (AcqHandle, 'TriggerSelector', 'FrameStart')
set_framegrabber_param (AcqHandle, 'TriggerMode', 'On')
set_framegrabber_param (AcqHandle, 'TriggerSource', 'Software')
grab_image_start (AcqHandle, -1)
for Index := 1 to 2105 by 1
    set_framegrabber_param (AcqHandle, 'TriggerSoftware', 1)
    grab_image_async (Image, AcqHandle, -1)
endfor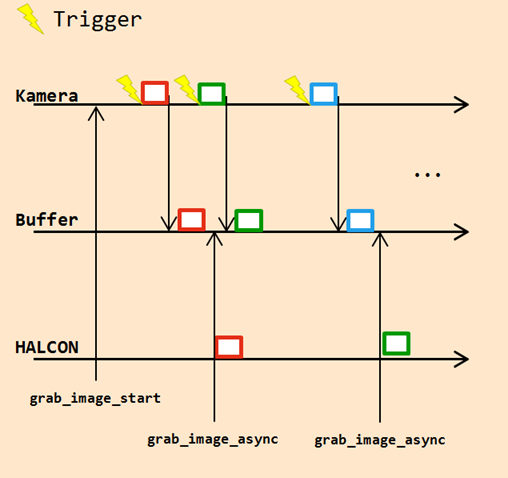
For a hardware triggered acquisition, the user just needs to change the TriggerSource to the line which carries the trigger signal.
For a synchronous grab, the operator grab_image can be used as well. It tells the camera to acquire a single image and returns this image as a HALCON object. This operator is much slower than grab_image_async for several reasons and should therefore not be used when speed or timing are relevant (such as for a triggered acquisition). However, grab_image can be useful for simple prototyping of an HDevelop script or if the image acquisition should be triggered by human interaction (such as clicking a button).
To learn more about image acquisition in HALCON please have a look at our interface documentations [3], and our standard examples which cover a large number of use cases.
[1] https://www.emva.org/wp-content/uploads/GenICam_SFNC_v2_6.pdf
[2] https://www.emva.org/wp-content/uploads/GenICam_GenTL_SFNC_1_2.pdf