Segment Image Pixel-Precisely
Use this tool to segment images with pixel precision into predefined classes that were previously trained in a deep learning model.
This tool requires a trained deep learning model for semantic segmentation. If a model file for semantic segmentation is available, you can immediately use it in this MERLIC tool. If no model is available, you can use MVTec's Deep Learning Tool to train a deep learning model for semantic segmentation. The workflow is as follows: Define classes, label your images accordingly, and finally, train the deep learning model. You can then use this deep learning model in this MERLIC tool and apply it to the images. Each pixel in the input image will be assigned to one of the given classes defined in the used deep learning model.
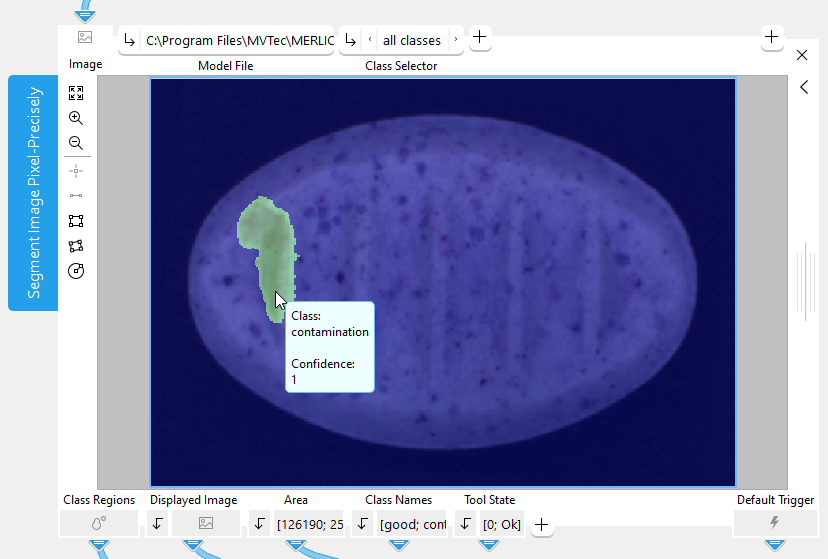
When moving the mouse pointer over the image in the Tool Board, a label with information on the segmentation is displayed at the mouse pointer. It shows the name of the class that is assigned to the pixel at the current mouse position as well as the corresponding confidence. The tool also recognizes regions of pixels belonging to the same class and you can configure which of these regions are displayed in the image. For more information, see the description of the parameter Class Selector.
For more information on how to create the deep learning model for semantic segmentation, please refer to the documentation of the MVTec Deep Learning Tool. While it is also possible to use MVTec HALCON to train the model, it is recommended to use the MVTec Deep Learning Tool.
Support of Artificial Intelligence Acceleration Interfaces (AI²)
MERLIC comes with Artificial Intelligence Acceleration Interfaces (AI²) for the NVIDIA® TensorRT™ SDK and the Intel® Distribution of OpenVINO™ toolkit. Thus, you can use AI accelerator hardware as processing unit that is compatible with the NVIDIA® TensorRT™ or the OpenVINO™ toolkit to perform optimized inference on the respective hardware, e.g., NVIDIA® GPUs or hardware supporting the OpenVINO™ toolkit such as CPUs, Intel® GPUs, and Movidius™ VPUs. This way, you can achieve significantly faster deep learning inference times. The respective hardware can be selected at the tool parameter "Processing Unit".
Prerequisites
NVIDIA® GPUs and CPUs with support of the OpenVINO™ toolkit can be used immediately after the installation of MERLIC. There is no additional installation or setup required.
To use Intel® GPUs and VPUs with the OpenVINO™ toolkit as processing unit, the following prerequisites apply:
- You first have to install the Intel® Distribution of OpenVINO™ toolkit.
- You have to start MERLIC in an OpenVINO™ toolkit environment.
For more detailed information on the installation and the prerequisites, see the topic AI² Interfaces for Tools with Deep Learning.
Parameters
Basic Parameters
Image
This parameter represents the image to be segmented.
Model File:
This parameter defines the deep learning model (.hdl file format) which serves as classifier for the semantic segmentation. The image can be segmented into all classes defined by the selected model.
While it is also possible to use MVTec HALCON to train the classifier file, it is recommended to use the MVTec Deep Learning Tool.
Technically, it is also possible to create a classifier with MVTec HALCON. However, this tool only supports classifiers that were trained with the default values for the following preprocessing parameters:
- NormalizationType = "none"
- DomainHandling = "full_domain"
Class Selector:
This parameter allows you to select the classes whose regions you want to inspect. The list of possible options depends on the classifier that is selected at the parameter "Model File". You can choose between the regions of all classes, the region of a specific class only, or the regions of all classes but without a specific class, for example, to show the regions of all classes except the one of the background class. By default, "all classes" is selected.
The regions of the selected classes will be displayed in the image. These regions are also returned in the tool result "Class Regions".
Additional Parameters
Processing Region:
This parameter defines the region for processing. Image parts outside of this region are not processed. If the region is empty, the whole image is processed.
By default, "Processing Region" is defined as empty region. To specify a "Processing Region", you have to connect the parameter to an appropriate region result of a previous tool to make sure that a region is transmitted to this tool.
ROI:
This parameter defines the region of interest (ROI) for processing. Image parts outside of the union of the ROI and "Processing Region" are not processed. In addition, if either of them is empty, the image part inside of the other one is processed. In case both of them are empty, the whole image is processed.
By default the ROI is defined as an empty ROI. If you want to use a non-empty ROI for the processing, you either have to connect the parameter to an appropriate ROI result of a previous tool or you have to draw new ROIs into the image using the available ROI buttons.
Processing Unit:
This parameter defines the device used for processing the images. The parameter is set to "auto" by default. In this mode, MERLIC tries to choose a suitable GPU as processing unit because it usually performs better than the CPU. However, this requires at least 4 GB of available memory on the respective GPU. If no suitable GPU is found, the CPU is used as fallback.
You can also choose the processing unit manually. Click on the parameter to select the device from the list of all available processing units. If you are choosing a GPU as processing unit, we recommend to check that enough memory is available for the used deep learning model. Otherwise, undesirable effects such as slower inference times might occur.
MERLIC also supports the use of AI accelerator hardware that is compatible with the NVIDIA® TensorRT™ SDK or the OpenVINO™ toolkit:
- NVIDIA® GPUs
- CPUs, Intel® GPUs, Intel® VPUs (MYRIAD and HDDL) with support of the OpenVINO™ toolkit
The respective devices are marked either with the prefix "TensorRT(TM)" or "OpenVINO(TM)". If you select a device that supports NVIDIA® TensorRT™ or the OpenVINO™ toolkit, the memory will be initialized on the device via the respective plug-in for the AI² interface.
As soon as an AI accelerator hardware has been selected as processing unit, the optimization of the deep learning model is started. After the optimization, all parameters that represent model parameters will be internally set to read-only. Thus, their values cannot be changed anymore as long as the selected AI accelerator is used as processing unit. To change the parameters, you first have to change the processing unit to a different one without any AI acceleration. After setting the parameters, you can set the processing unit back to the respective AI accelerator hardware.
CPUs with support of the OpenVINO™ toolkit can be used without any additional installation steps. They will be automatically available in the list of available processing units. If multiple processing units with the same name are available, an index number is assigned to their name. The same applies to GPUs with support of the NVIDIA® TensorRT™.
To use GPUs and VPUs with the support of the OpenVINO™ toolkit as processing unit, the Intel® Distribution of OpenVINO™ toolkit must be installed on your computer and MERLIC must be started in an OpenVINO™ toolkit environment. See the topic AI² Interfaces for Tools with Deep Learning for more detailed information on the prerequisites.
Besides the optimization via AI accelerator hardware, MERLIC supports further dynamic optimizations via the NVIDIA® CUDA® Deep Neural Network (cuDNN). This optimization can be enabled via the MERLIC preferences in the MERLIC Creator. For more information, see the topic MERLIC Preferences.
Precision:
This parameter defines the data type that is used internally for the optimization of the deep learning model for inference, i.e., it defines the precision to which the model is converted to. It is set to "high" by default.
The following table shows the model precisions which are supported in this tool.
|
Value |
Description |
|---|---|
|
high |
The deep learning model is converted to a precision of "float32". |
|
medium |
The deep learning model is converted to a precision of "float16". |
Most processing units support both types of precisions. However, there might be some processing units that support only one of these precisions. In this case, only the supported precision will be available at the parameter as soon as the respective device has been selected at the parameter "Processing Unit". If the processing unit is selected automatically, i.e., if "Processing Unit" is set to "auto", only the precision "high" is available.
Results
Basic Results
Class Regions:
This result returns the regions of the classes that are selected for inspection at the parameter "Class Selector". Each of the regions contains all pixels belonging to the respective class, that is, the pixels that are assigned to the same class.
Internally, the result returns a tuple in which each element represents a placeholder for the region of one of the classes that are provided in the deep learning model. If only a specific class is selected at the parameter "Class Selector", only the regions of the selected class will be returned. The tuple elements representing the placeholders for the other classes will be empty.
Displayed Image:
This result returns an image that shows the resulting segmentation image with an overlay of the class regions. In the segmentation image, the assigned class is stored for every pixel of the input image. Depending on the value selected in "Class Selector", the respective regions will be displayed as overlay. To inspect only the regions, you can use the "Class Regions" result.
Area:
This result returns the size of each class region. They are returned in a tuple and sorted according to the order of the class names in the result "Class Names". Thus, the first value in the tuple represents the size of the first class returned in the "Class Names" result. The second value represents the size of the second class and so on.
Class Names:
This result returns the names of all classes that are defined in the selected deep learning model. They are returned in a tuple of strings.
Tool State:
"Tool State" returns information about the state of the tool and thus can be used for error handling. Please see the topic Tool State Result for more information about the different tool state results.
Additional Results
Confidence Image:
This result returns an image that contains the confidence values for each pixel. For each pixel in the input image, the respective confidence of the classification is stored, that is, the confidence with which the class was assigned to the pixel. The higher the confidence of a pixel, the higher its gray value.
Used Processing Unit:
This result returns the processing unit that was used in the last iteration. You can use this result to check which processing unit was actually used if the parameter "Processing Unit" is set to "auto" or to check that the correct one was used.
Precision Data Type:
This result returns the data type that was used internally for the optimization of the deep learning model for inference. You can use this result to check if the correct precision was used in case any problems occur.
If the parameter "Precision" is set to "high", the deep learning model should be converted to a precision of "float32". Therefore, this result is expected to return the data type "float32". If the parameter "Precision" is set to "medium", the deep learning model should be converted to a precision of "float16". In this case, the expected value for this result is the data type "float16". In case any problem occurred during an iteration of your MVApp, you could check if this result returns a different data type than expected and also have a look at the log file for more information. See the topic Logging for more information about the log files.
Processing Time:
This result returns the duration of the most recent execution of the tool in milliseconds. The result is provided as additional result. Therefore, it is hidden by default but it can be displayed via the ![]() button beside the tool results. For more information see the section Processing Time in the tool reference overview.
button beside the tool results. For more information see the section Processing Time in the tool reference overview.
Application Examples
This tool is used in the following MERLIC Vision App examples:
- segment_pill_defects.mvapp

