User Interfaces
The MERLIC user interfaces differ depending on the MERLIC component you are working with. The following sections offer an overview of the MERLIC user interfaces:
MERLIC Creator
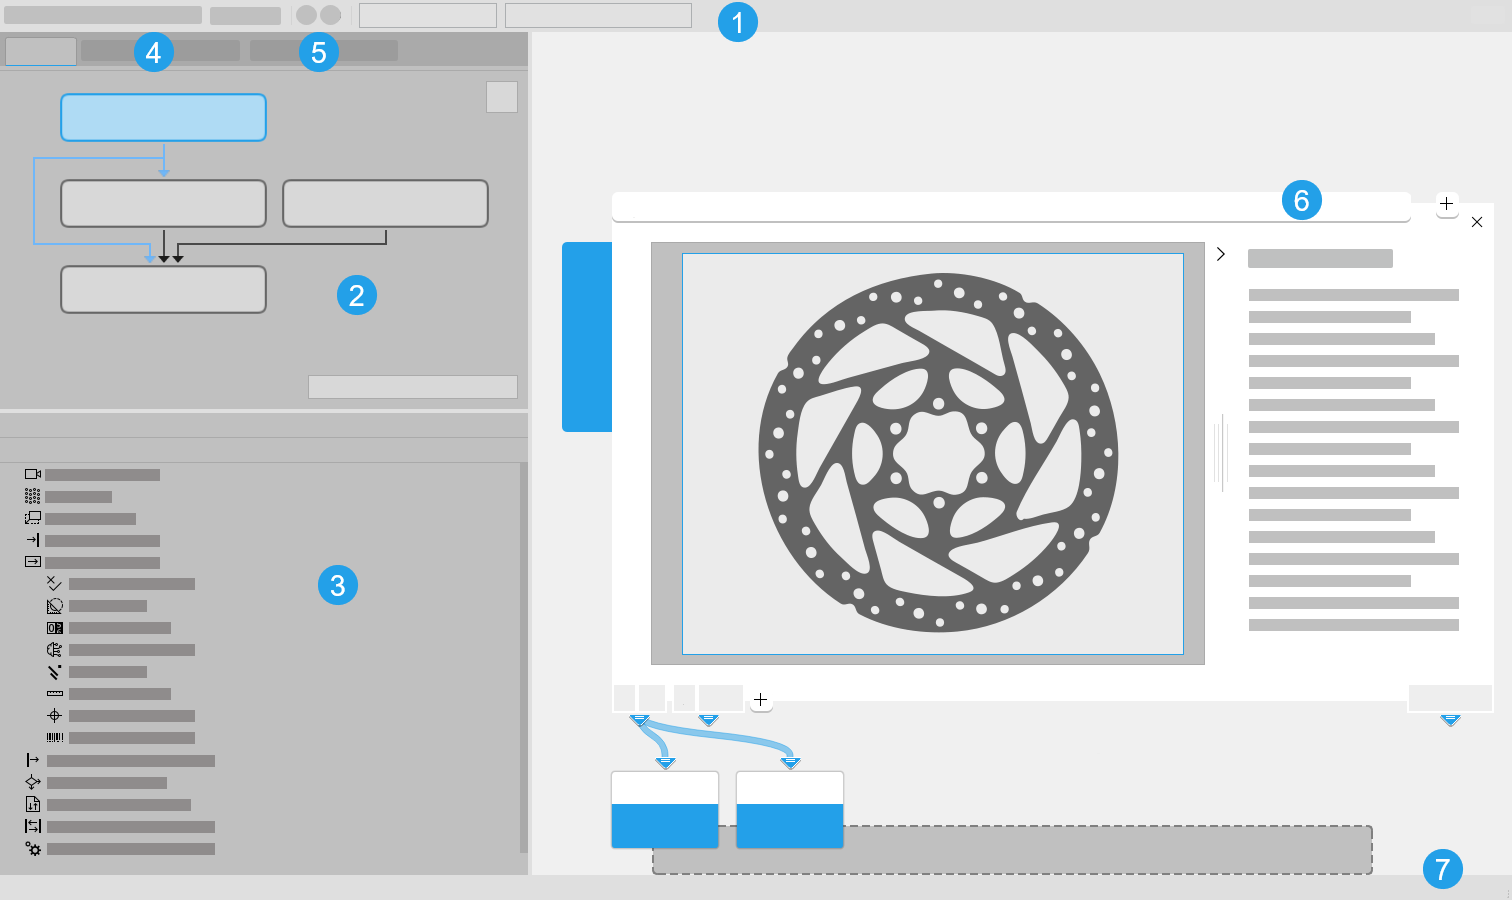
The graphical user interface of the MERLIC Creator consists of the following main parts:
 Menu Bar
The menu bar allows you to access all necessary standard functionality you need while working with MERLIC. It also allows you to set preferences and adapt the user interface to your needs. The menu contains several drop-down menus as well as a selection of buttons that provide shortcuts for frequently used functions.
 Tool Flow
The Tool Flow panel shows an overview of all tools that are used in the MERLIC Vision App A MERLIC Vision App represents an image processing application created in MERLIC. It consists of the tools in the MERLIC Creator, the Designer widgets, and all settings that are used in the application.. Furthermore, existing connections between tools are visualized.
 Tool Library
The Tool Library contains all available MERLIC tools A MERLIC tool is a modular unit with a specific functionality. It can be used to solve a specific task of an image processing application, to define conditions and expressions, or to communicate via various devices. Tools build the elementary part of a MERLIC Vision App. that can be used to create a MERLIC Vision App A MERLIC Vision App represents an image processing application created in MERLIC. It consists of the tools in the MERLIC Creator, the Designer widgets, and all settings that are used in the application..
 MVApp Parameters and Results
This panel shows a list with all specified MVApp parameters and MVApp results for MERLIC RTE, the process integration mode of MERLIC. The parameters and the results are listed according to their data type. Image results are always listed last and separately from other data types.
 Image Source Configuration
This panel provides information regarding the image acquisition for the MVApp. It shows the list of image sources that are currently available for use in the MVApp.
 Tool Workspace
The Tool Workspace shows the Tool Board of the currently selected MERLIC tool or tool group as well as incoming and outgoing connections to other tools.
 Status Bar
The status bar displays the processing time of the tool that is currently shown in the tool workspace. It returns the duration of the most recent execution of the tool in milliseconds and corresponds to the value returned in the tool result "Processing Time". For more information about the processing time, see the section Processing Time in the topic MERLIC Tool Reference.
MERLIC Designer
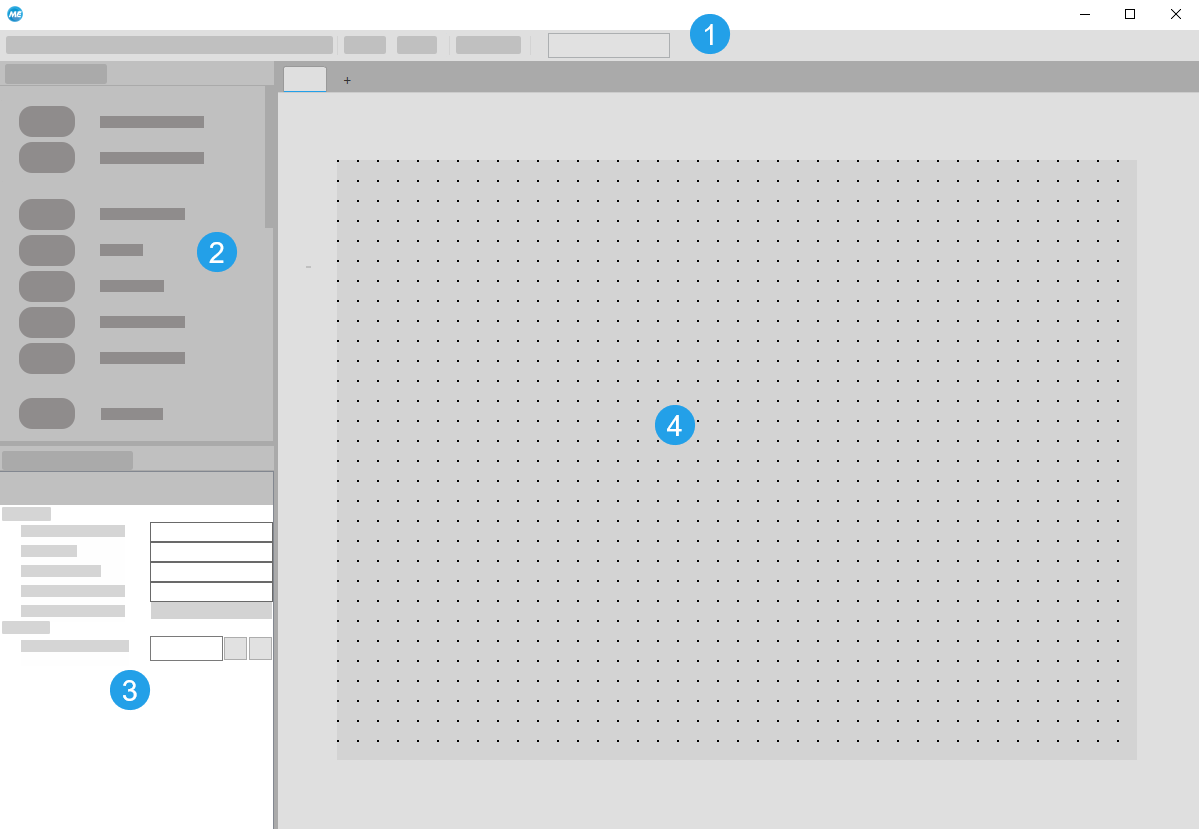
The graphical user interface of the MERLIC Designer consists of the following main parts:
Menu Bar
The menu bar allows you to access necessary functionality you might need while working with the MERLIC Designer. It contains several drop-down menus as well as a selection of buttons that provide shortcuts for frequently used functions.
Widget Library
This panel contains all available MERLIC widgets that can be used to create a Frontend design.
Properties Panel
This panel allows you access to the properties of the individual widgets. You can adjust visual and control settings of the elements as well as connections to the MERLIC Creator. The available properties may vary depending on the widget.
Workspace
The workspace is the area in which the design of the Frontend can be composed. It defines the size and elements of your Frontend. All widgets that are inserted to your workspace will be displayed in the Frontend.
MERLIC Frontend
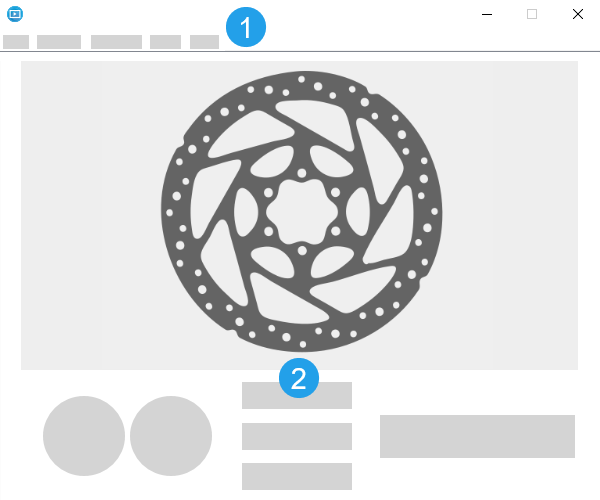
The graphical user interface of the MERLIC Frontend consists of the two parts:
Menu Bar
The menu bar of the MERLIC Frontend allows you to access necessary functionality you might need while working with the Frontend. It contains several drop-down menus that provide shortcuts for frequently used functions.
Frontend Design
Your Frontend design is the implementation of the user interface you created in the MERLIC Designer. You can compose a design that is specifically tailored to your needs. For more information about creating a Frontend design, see the topic Designing Your Frontend.
"Image Sources" Tab
The Image Source Manager provides a graphical user interface for the configuration of image sources. It is part of the MERLIC Runtime Environment Setup represented by the tab "Image Sources". The graphical user interface of the Image Source Manager changes depending on whether you are editing configurations or image sources.
General User Interface
![]() List of Configurations and Image Sources
List of Configurations and Image Sources
User Interface for selected Configurations

User Interface for selected Image Sources

Tab Overview
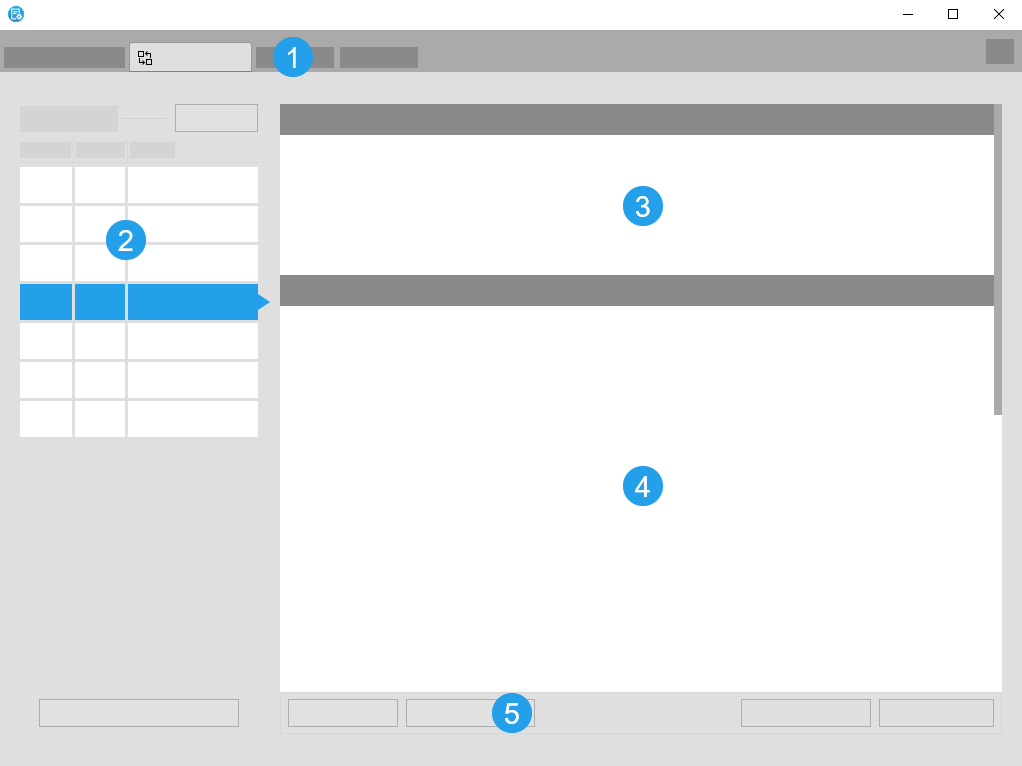
Using the tabs, you can switch between the different components of the MERLIC RTE Setup: Image Source, Communication, Recipes, and I/O. Each component has its own graphical user interface.
List of Configurations and Image Sources
The list of configurations shows all the available image source configurations with their respective type, status, and name. A configuration represents a set of image sources. The selected configuration is marked blue. If the configuration is expanded, the image sources of the configuration will be shown with their status and name. The status of the configuration indicates if the configuration is active or not, that is, if the image sources of the configuration are currently available for the configuration and for the use in an MVApp. Only one configuration can be activated at the same time but it is possible that no configuration is active at all. For more information, see the topic Adding New Configurations and Image Sources.
Action Buttons
With the action buttons at the bottom of the window you can perform different configuration tasks, such as adding and removing new configurations and image sources. You can also activate and deactivate the selected configurations. When you open the image source configuration for the first time, you have to create a configuration before you can add an image source, because each image source must be assigned to a configuration.
Configuration Details
The "Configuration" section provides you with details about the selected configuration. It displays the configuration name, its status and type, and whether the configuration is used as RTE startup configuration.
Image Source Details
The "Image Sources" section provides you with details about the selected image source. It displays the image source name and its interface type, that is, the camera type or file. Depending on the interface type, the "Image Source" section provides the camera name or the file path. It also displays the status of the image source.
Image Preview
The image display allows you to check the configuration of the selected image source in real time. When using a camera device, you can use the buttons at the bottom of the image display to activate the live mode of the camera or to take single snapshots. The acquired images will be displayed in the image preview and you can instantly see how configuration changes at the camera parameters affects the acquired images. When using peripheral devices that acquire no images, such as lighting or lens controllers, you can use the image preview to display the images of a specific camera device. This allows you to check how configuration changes at the device parameters affect the images acquired by the respective camera. If your image source is an image directory, the live mode will display all images from the directory consecutively and continuously, while the snapshot mode allows you to step through the images one-by-one. You can also save snapshots to use images from a file directory during the creation and configuration of your MVApp. For more information, see the topic Configuring Camera Devices.
Info
In the "Info" section, you can see general information about the image source, for example, the name of the image source and the current status.
 Camera Parameters
The camera parameters section enables you to configure the selected camera device. The camera parameters of a specific camera device are only visible if the configuration that it is stored in is active. After activating the configuration and selecting a camera device to configure, you can adjust the parameter of your selected camera device according to your needs. For more information, see the topic Adjusting Camera Parameters.
"Communication" Tab
MERLIC provides a graphical user interface for the configuration of plug-ins. It is part of the MERLIC Runtime Environment Setup represented by the tab "Communication". The graphical user interface of the MERLIC Communicator consists of the following main parts:
Tab Overview
Using the tabs, you can switch between the different components of the MERLIC RTE Setup: Image Source, Communication, Recipes, and I/O. Each component has its own graphical user interface.
List of Plug-in Instances
The list of plug-in instances shows all the available plug-ins with their respective execution status, ID, and name. The name represents the name of the Communicator plug-in. If you add multiple instances of a plug-in, all instances of this plug-in will show the same name. However, the IDs of the plug-in instances are unique. The selected plug-in is marked blue. For more information, see the topic Adding a Plug-in Instance.
Plug-in Parameters
The "Plug-in parameters" section provides you with the general parameters of the selected plug-in that cannot be adjusted. They may show the version number of the plug-in, the current parameter value for the log level, the access level of the plug-in, and the setting for the validation of the plug-in configuration. For more information, see the topic Configuring Communicator Plug-ins in the MERLIC Communicator manual.
User Parameters
The "User parameters" section provides you with the parameters of the selected plug-in that can be configured. It depends on the implementation of the respective plug-in what kind of parameters this entails. For more information, see the topic Configuring Communicator Plug-ins in the MERLIC Communicator manual.
Action Buttons
With the action buttons at the bottom of the window you can perform tasks, such as adding and removing a plug-in instance, or starting and stopping a plug-in. You can also discard or save the changes that were made to the user parameters.
"Recipes" Tab
The "Recipes" tab in the MERLIC Runtime Environment Setup provides a graphical user interface for the configuration of recipes. It consists of the following main parts:

Tab Overview
Using the tabs, you can switch between the different components of the MERLIC RTE Setup: Image Source, Communication, Recipes, and I/O. Each component has its own graphical user interface.
List of Recipes
The list of recipes shows all imported and thus available recipes with their respective ID and name. The selected configuration is marked blue. You can change the order of the recipes with drag-and-drop. Before you can see recipes in the list of recipes, you first have to create and import them. For more information, see the topics Creating a MERLIC Recipe and Importing MERLIC Recipes.
Recipe
The "Recipe" section of the "Recipes" tab shows the full file path to the selected recipe. If a description has been defined for the recipe, it is also shown in this section below the file path.
MVApp
The "MVApp" section of the "Recipes" tab shows the name and relative file path to the referenced MVApp.
MVApp Parameters
The "MVApp Parameters" section of the "Recipes" tab shows the tool parameters of the MVApp that have been set as MVApp parameters for the process integration and the associated input values that are defined in the recipe. In detail, the MVApp parameters are listed by their data type and the order in which they have been defined in the MERLIC Creator. The "MVApp parameters" section displays the position ID of the parameter, the name of the tool parameter that was given by the user, and the input value that has been defined in the recipe.
Action Buttons
With the action buttons at the bottom of the window you can make a recipe your default recipe, or remove it.
"I/O" Tab
The "I/O" tab in the MERLIC Runtime Environment Setup provides a graphical user interface for the configuration of recipes. It consists of the following main parts:

Tab Overview
Using the tabs, you can switch between the different components of the MERLIC RTE Setup: Image Source, Communication, Recipes, and I/O. Each component has its own graphical user interface.
Enabled Devices
The "Enabled Devices" section of the "I/O" tab shows all of the enabled I/O devices as well as their configuration state. The selected I/O device is marked blue. For more information, see the topic Selecting Devices.
List of Devices
The list of devices shows all the I/O devices that are currently available for use. Choose one of the devices from the list to move it into the "Enabled Devices" section. For more information, see the topic Selecting Devices.
Configurations
The "Configurations" section of the "I/O" tab shows all the configuration possibilities of the selected I/O device that can be adjusted with MERLIC. Some I/O devices, such as Hilscher cards, need to be mostly configured beforehand with an external configuration software, and MERLIC only offers some final configuration steps.
Action Buttons
With the action buttons at the bottom of the window you can enable and disable I/O devices as well as save configurations or restore default configurations.

