Using Image Sources in MVApps
To use the images acquired by the Image Source Manager in a MERLIC Vision App, you have to use the Image Source tool. With this tool, you can select the desired image source whose images should be used for the image processing.
The Image Source tool is only necessary if you are using the Image Source Manager for the image acquisition, that is, if you configured your image sources via the "Image Sources" tab of the MERLIC RTE Setup.
Overview of the Available Image Sources
To use the images of a specific image source in your MVApp, you have to ensure that the respective image source configuration is currently active.
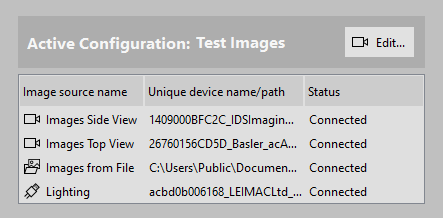
If you want to check which image sources are currently available for use in your MVApp, you can look up the current state in the "Image Source Configuration" panel of the MERLIC Creator. The panel shows which configuration is active and provides an overview of all image sources in that configuration.
For each available image source, the respective image source name is shown as well as the icon representing the type of the image source. Image directories are indicated the icon ![]() . In addition, the location of the respective image directory is displayed. For camera devices indicated by the icon
. In addition, the location of the respective image directory is displayed. For camera devices indicated by the icon ![]() , the respective unique camera name is displayed. Image sources representing peripheral devices such as lighting or lens controllers are indicated by the icon
, the respective unique camera name is displayed. Image sources representing peripheral devices such as lighting or lens controllers are indicated by the icon ![]() and shown with the respective unique device name. The corresponding status indicates whether the image source is connected and ready for use. If the status is "Connected", the image source is available and ready for use. If it is "Disconnected", you might have to check the configuration again.
and shown with the respective unique device name. The corresponding status indicates whether the image source is connected and ready for use. If the status is "Connected", the image source is available and ready for use. If it is "Disconnected", you might have to check the configuration again.
If you need to adjust the settings of an image source or if you are missing an image source in your active configuration, you can open the "Image Sources" tab of the MERLIC RTE Setup via the " Edit..." button.
During the start up MERLIC will automatically open all image sources of your active configuration. If you are not sure which configuration is active or if the image source you want to use is available, check the "Image Source Configuration" panel and make sure that the desired image source is part of the currently active configuration. Otherwise, the image source will not be available for the MVApp.
Setting Up the Image Source in the MVApp
The set up of an image source in the MVApp can be done in just a few steps as described below.
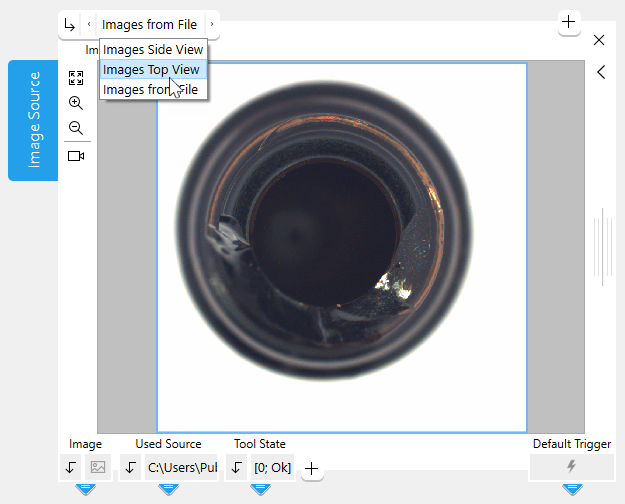
- Select the "Image Source" tool in your Tool Flow. If your MVApp contains no "Image Source" tool, add it to your Tool Flow. The tool automatically selects the first image source of the active configuration. If you want to use the images of a different image source, change the image source as described in the next step.
- Select the desired image source at the tool parameter "Image Source Name". If the desired image source is not shown, check if the configuration, in which the image source is stored, is active. If an acquisition sequence other than the base sequence is active, the parameter shows the unique names of all images that were acquired in the active acquisition sequence. These names correspond to the values that are defined in the active sequence in the "AcquireImage" actions for the "ImageName" attribute.
Only image sources of the currently active configuration are available for selection. In addition, keep in mind that the "Image Source" tool is meant to obtain images acquired by the Image Source Manager. Thus, image sources that have been added with the option not to acquire images, for example, lighting controllers, cannot be selected in the tool.
If an acquisition sequence other than the base sequence is active, the parameter shows the unique names of all images that were acquired in the active acquisition sequence. These names correspond to the values that are defined in the active sequence in the "AcquireImage" actions for the "ImageName" attribute.
- Run the MVApp in single steps or continuously to check the images that are acquired from the selected image source. In case of an image file directory, the execution of the MVApp steps through the images in the directory. The acquired image will be returned in the tool result "Image" on the bottom of the tool board. The result can be connected to other tools to use the image for the actual image processing task in MERLIC.
During each execution, MERLIC acquires images from all image sources of the active configuration even if they are not selected in this tool. Only the image of the selected image source is shown as a result.
You can use multiple image sources in your MVApp by adding an "Image Source" tool for each image source you want to use. The image acquisition from multiple cameras occurs simultaneously. However, keep in mind that the number of allowed camera devices depends on your MERLIC license. For more information, see the topic License Restrictions for the Image Acquisition.
Error Handling
In order to acquire images via the Image Source Manager, the following requirements must be fulfilled:
- The image source that is selected in the tool exists.
- The image source configuration that contains the selected image source is active.
- The connection to the selected image source, for example, a camera device, is established.
If any of these conditions is not met, no image can be acquired. In this case, an error or warning will be displayed in the tool indicating the cause of the problem.
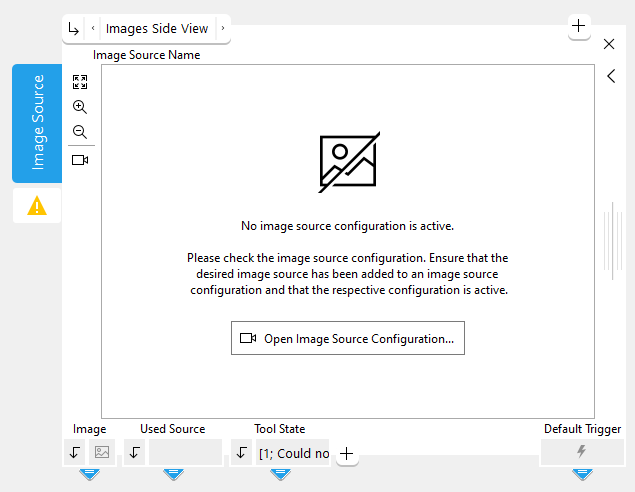
In the following example image, no image source configuration is active. Therefore, no image could be acquired from the selected image source. In this case, a message is displayed on the Tool Board indicating the cause of the problem. In addition, a warning is reported for the tool indicated by the warning icon ![]() and the value of the "Tool State" result. To fix such a problem, you can open the image source configuration using the button provided in the Tool Board, check the configuration of your image sources, and make the required adjustments.
and the value of the "Tool State" result. To fix such a problem, you can open the image source configuration using the button provided in the Tool Board, check the configuration of your image sources, and make the required adjustments.
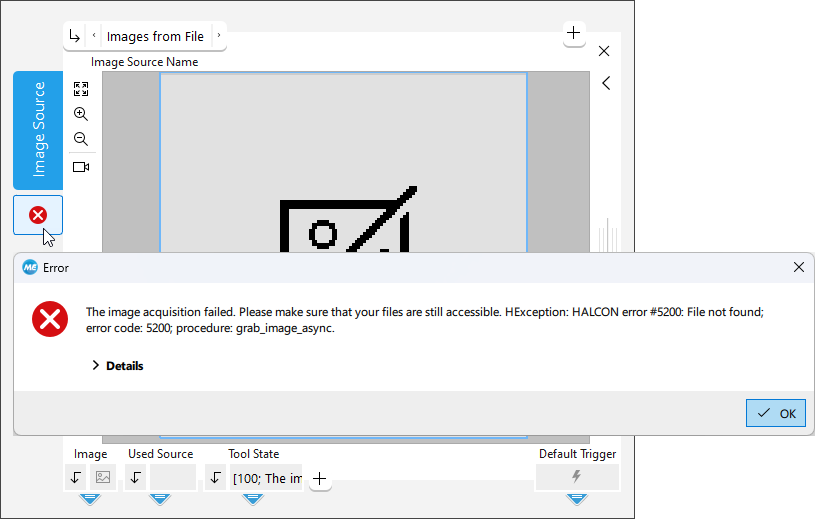
In the following example image, the selected image source represents an image file directory. However, the image files could not be found in the specified location. Therefore, an error occurs which is displayed by the error icon ![]() and the value of the "Tool State" result. You can check the status of the image sources in the "Image Source Configuration" panel of the MERLIC Creator as well as in the "Image Sources" tab in the MERLIC RTE Setup to find the cause of the problem.
and the value of the "Tool State" result. You can check the status of the image sources in the "Image Source Configuration" panel of the MERLIC Creator as well as in the "Image Sources" tab in the MERLIC RTE Setup to find the cause of the problem.
In general, you can always check the status of the available image sources in the "Image Source Configuration" panel of the MERLIC Creator. If you need to adjust the image source configuration, you can open the "Image Sources" tab in the MERLIC RTE Setup any time and fix the problem.
Image Acquisition Errors in the MERLIC Creator
If an image acquisition error occurs when running the MVApp in the MERLIC Creator, you can check the "Tool State" result of the "Image Source" tool to get information about the error. In addition, you can check the status of the available image sources in the "Image Source Configuration" panel of the MERLIC Creator and open the MERLIC RTE Setup to adjust the configuration of the image sources in the "Image Sources" tab.
Image Acquisition Errors in MERLIC RTE Mode
Most image acquisition errors that might occur while MERLIC RTE is running, that is, during the process integration mode, are already detected and processed by MERLIC RTE before the MVApp is executed. For more detailed information, see Configuring Image Sources During Process Integration.
However, in case the image source is missing in the active configuration, the MVApp will be executed although no image could be acquired. Instead, the "Image Source" tool shows an error image which will be forwarded to the connected tools. If the image processing task in the subsequent tools can then be performed without errors, it might take some time until the problem is detected. The respective error is shown in the "Tool State" result of the "Image Source" tool.
To avoid such cases, you can monitor the "Tool State" result of the "Image Source" tool and implement your application to react accordingly in case the value of the "Tool State" result is not "OK", for example, by sending a "Halt" signal to stop the execution in order to fix the problem.
Further Troubleshooting
If the image acquisition is not working properly, you can also check the following:
- Cable and network connection: There may be insufficient bandwidth, cable breaks, or problems due to firewall and anti virus scanners. Verify if "Jumbo Frames” are enabled in your network configurations. Refer to your operating system’s manual for more information.
- Connection to the camera: If the camera is disconnected, non-persistent camera parameters may be lost after it is reconnected. To connect to a different camera it may be necessary to end existing connections by closing other running MERLIC processes.
- Slow acquisition or timeouts: MERLIC tries to acquire images from all image sources that are configured via the Image Source Manager. This may lead to a timeout. Remove the image source configurations that are not used in your MVApps to speed up the image acquisition.

