Checking the Tool Procedure in an HDevelop Program
If all parameter settings of the HDevelop procedure representing the new custom tool have been defined accordingly as described in the topic Defining the Procedure Settings, you can change back to the main procedure of the HDevelop program.
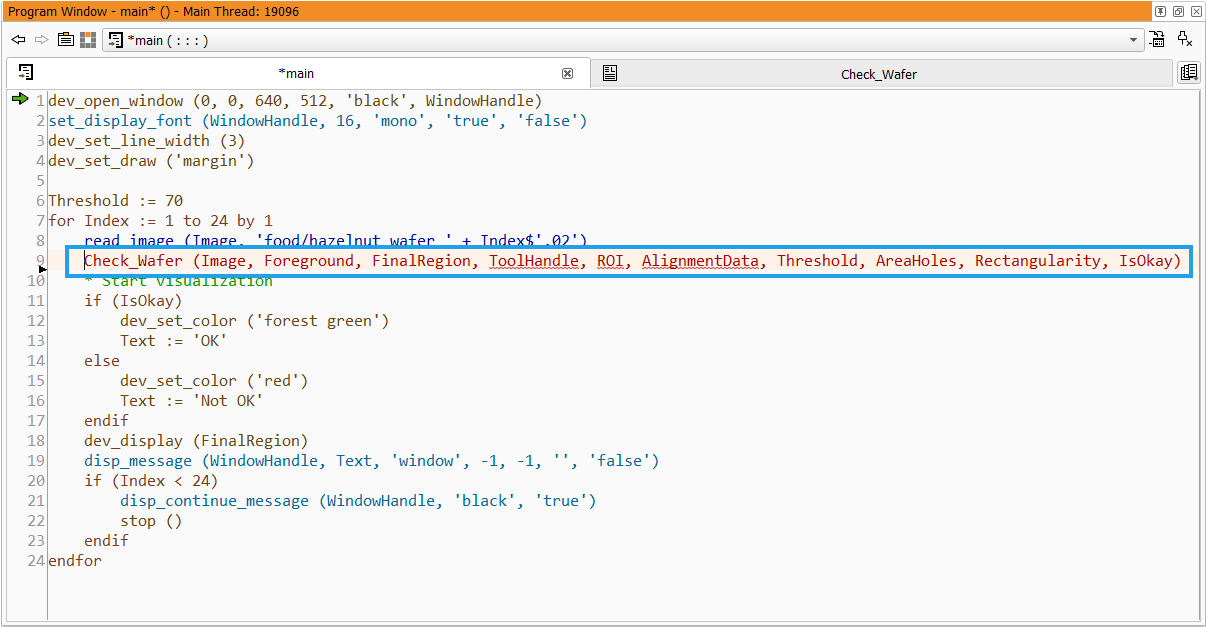
The "Program Window" of HDevelop now shows the program with the new procedure call which replaces the code lines that have been selected when creating the new procedure. If you added a "ToolHandle" parameter to your procedure, it might be necessary to initialize the parameter as described below. This applies for all parameters that have been added in the procedure setting but have not been initialized. Otherwise, the code line which calls the new procedure is highlighted in a different color and the respective parameters are underlined as shown in the example image below. In addition, the HDevelop program cannot be executed if the initialization of any parameter, e.g., the "ToolHandle", is missing.
Initializing the "ToolHandle" Parameter
To initialize the "ToolHandle" parameter, you can use the MERLIC procedure MeTest_create_tool_handle(ToolHandle). It is contained in the auxiliary procedure library "ToolTestFramework.hdpl" which can be found in the directory "examples\tool_development\procedures" within the MERLIC installation directory.
- Open your HDevelop program or procedure in which the procedure representing your custom tool is called. In our example, this is the "main" procedure.
- Add the MERLIC procedure MeTest_create_tool_handle(ToolHandle) at a position before calling the procedure of your custom tool.

As soon as you added the initialization of the "ToolHandle" parameter, the parameter is not underlined anymore. However, the procedure which calls the procedure of the custom tool is still highlighted differently because the parameters "ROI" and "AlignmentData" are not initialized yet. The next section describes how we implement the initialization of the these parameters in the example custom tool.
Initializing the Parameters for ROI and Alignment Data
The initialization of the parameters for the ROI and the alignment data can be done in different ways. You can either set the parameters to an empty tuple or to a specific value.
In the example below, the ROI parameter is initialized first and then a paraxial rectangle ROI is created and inserted at the specified position with the specified size using the interface procedure Me_insert_paraxial_rect. MERLIC provide an interface procedure for the ROI creation for each type of ROIs. For more information about the ROI handling in our example custom tool, see the topic Using Region of Interest (ROI).
For the initialization of the alignment data, the respective parameter is set to an empty tuple. In the example code below, the alignment data are only initialized. They are not set to a specific homogeneous 2D transformation matrix. For more information about the alignment data in a custom tool, see the topic Using Alignment Data.
The following image shows the program with the initialization of the parameters for the ROI and the alignment data.

As soon as all parameters are initialized, the code which calls the procedure of the custom tool is not highlighted differently anymore. Thus, it is now possible to executed the program to check in HDevelop if the implementation of the custom tool procedure works as expected. If you want to see the HDevelop program that can be used to test the example tool template "Check_Wafer" in HDevelop, open the program "Check_Wafer_Test.hdev" in the example folder of the MERLIC installation, e.g., "%PROGRAMFILES%\MVTec\MERLIC-5.6\examples\tool_development\tool_templates".
In the next step, you can check your tool in MERLIC as described in the topic Integrating a Custom Tool in MERLIC and you can add a short documentation for the tool board of your custom tool as described in the topic Adding a Quick Info for a Custom Tool.

