Defining the Procedure Settings
After creating the procedure for your custom MERLIC tool as described in the topic Creating an HDevelop Procedure for the Tool, you have to define some settings of the procedure. This can be done in the procedure interface dialog of HDevelop. The procedure interface dialog allows you to check and define the input and output parameters of the procedure and to specify the individual parameter settings.
The input and output parameters correspond to the tool parameters and tool results of your custom MERLIC tool. Therefore, you can determine which tool parameters and results will be visible when using the tool in MERLIC. You can also define further parameter settings such as the respective semantic type or the allowed value range of the tool parameters. Beside the settings for each parameter, the procedure interface dialog also enables you to set the tool category for your custom tool, i.e., the category in which your custom tool will be visible in MERLIC.
The following sections describe in more detail how to open the procedure interface dialog and how to define the various settings.
- Opening the Procedure Interface Dialog
- Defining the Tool Parameters and Results
- Defining the Parameter Settings
Opening the Procedure Interface Dialog
You can open the procedure interface dialog of HDevelop in different ways. However, for this documentation, we can focus on the most common way:
- In the "Program Window" of HDevelop, select your procedure from the drop-down menu.

- Click on the button
 next to the drop down to open the procedure interface dialog for the selected procedure.
Defining the Tool Parameters and Results
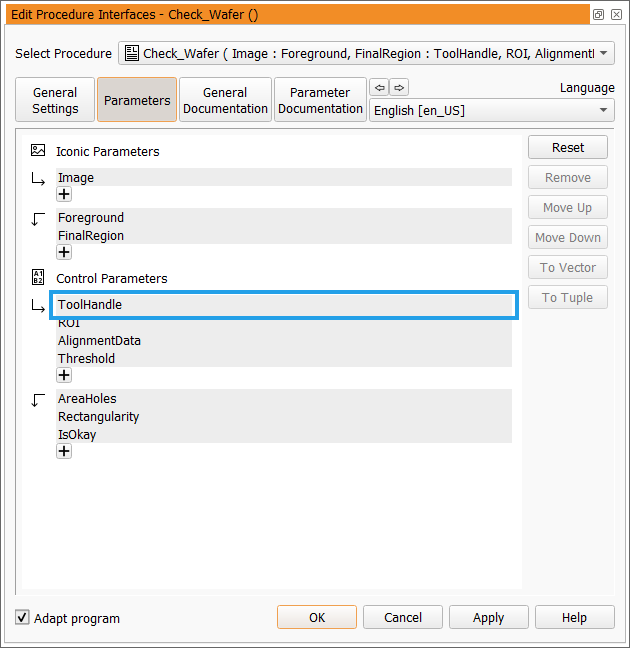
To define the parameters and results of a custom tool, i.e., the input and output parameters of the respective procedure, click on the "Parameters" button in the procedure interface dialog. Then, the list of current procedure parameters is shown. The parameters are separated in iconic parameters (graphical values) and control parameters (numerical values) which in turn are divided in input and output parameters.
You can check if any parameters can be removed or if you want to rename a parameter. If you want to make use of the MERLIC procedures, you have to add an input control parameter named "ToolHandle" as described in the section Adding the Parameter "ToolHandle".
For our example custom tool, we also added a new parameter for regions of interest (ROIs) and a parameter for alignment data. See the topics Using Region of Interest (ROI) and Using Alignment Data for more information about the required settings for theses parameters.

Adding the Parameter "ToolHandle"
If you want to make use of the interface procedures in your code, a specific input control parameter named "ToolHandle" is required. It is expected at the first position of the input control parameters. Therefore, you have to make sure to add the "ToolHandle" parameter and to place it at the first position as described below. After adding the "ToolHandle" parameter, you also have to define its settings as described in the section Required Settings for the Parameter "ToolHandle".
- In the "Parameters" view of the procedure interface dialog, click on the icon
 for input control parameters.
 - Enter the parameter name "ToolHandle".
- Move the parameter to the top of the input control parameters using the button "Move Up".
This step is only mandatory if you want to use the interface procedures provided by MERLIC. If you implemented your tool without any interface procedure, you do not have to add a "ToolHandle" parameter.
Renaming Parameters
The names of the procedure parameters will be visible in MERLIC for the corresponding tool parameters and results of your custom tool. If you want to use a different name for a tool parameter or result, you can change the name of the corresponding parameter in the "Parameters" view of the procedure settings.
- Click on the parameter to be renamed.
- Type the new parameter name. Parameters can have arbitrary names. However, in HDevelop it is not allowed to use the same name for input and output parameters. You have to make sure to use a different name.
Defining Additional Tool Parameters and Results
MERLIC enables you to set tool parameters and tool results as "additional" parameters and "additional" results. These type of parameter and results will not be visible by default at the tool board in MERLIC. They can be accessed and added to the tool via the + button next to the tool parameters and result. This way, you can hide specific parameters and results, e.g., if they are only required for rare used cases or if you want to save some space on the tool board.
Additional parameters and results must be defined in the _Info procedure of a custom tool. They need to be provided in a predefined parameter which expects a predefined structure of values. For detailed information on how to define additional parameters and results, see the topic of the _Info procedure.
Defining the Parameter Settings
To define the individual settings of the procedure parameters, click on the button "Parameter Documentation" in the procedure interface dialog. Then, the tab cards for all parameters of the current procedure are shown. The respective tab cards contain the parameter settings, e.g., the semantic type or default value. You have to define the settings for all parameters of the procedure.

The available settings for a parameter depend on the parameter type (iconic or control parameter), and on the selected semantics. In the following, we describe the most common settings of both iconic and control parameters that should be defined.
|
Setting |
Description |
|---|---|
|
Semantics |
Specify the semantic type of the parameter. See the topic Semantic Types for more information. |
|
Type List |
Specify the accepted data types. |
|
Default Type |
Specify the default of the semantic types for specific control parameters. See the topic Semantic Types for more information. |
|
Mixed Types |
Specify whether a tuple may contain values of different data types ("True") or if it may contain only values of the same data type ("False"). |
|
Default Value |
Define the default value for the parameter. |
|
Values |
Specify the allowed values for the parameter as a comma-separated list. To restrict the available values to the ones that are specified in this parameter, check the check box "Exclusively". |
|
Value Min Value Max |
Set a minimum and maximum value for the parameter and check the check box "Enabled" to enable the defined value range. |
|
Multi Value |
Select how may values the parameter may accept:
See the topic Semantic Types for more information. |
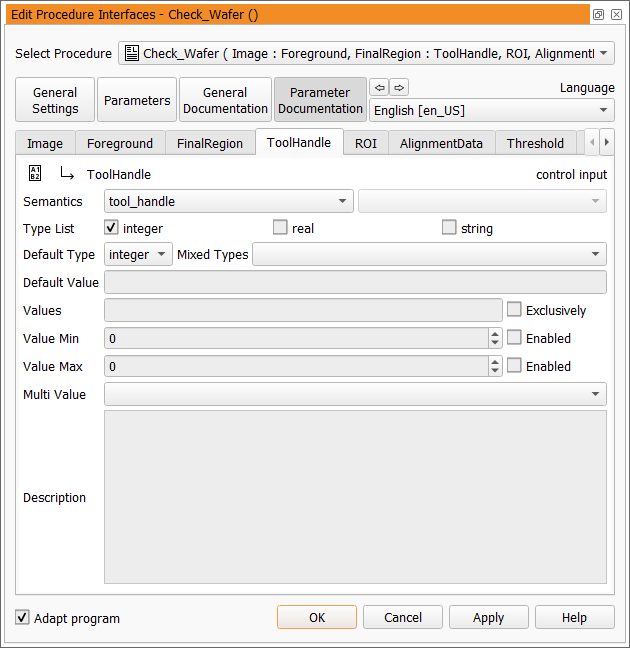
Required Settings for the Parameter "ToolHandle"
For the parameter "ToolHandle", you have to define the settings as follows:
|
Setting |
Value |
|---|---|
|
Semantics |
tool_handle |
|
Type List |
integer |
|
Default Type |
integer |
Keep in mind to apply or save your changes afterward. The parameter settings for "ToolHandle" should then look like the settings in our example: