Creating Groups
MERLIC enables you to combine multiple tools of your MERLIC Vision App (MVApp) in a group. When configuring your MVApp, you might want to use groups to combine tools that perform similar processing tasks, or you might just want to provide a better overview in your MVApp. You can simply select the tools you want to combine and create a group.
If you are using groups in your MVApp, this might also affect the Frontend design of the MVApp. For more information, see Adjusting Your Widgets.
In the following, you can find information on how to group and ungroup multiple tools, and also which type of configurations you can perform for a group. For more information on the visualization of groups and how to work with its parameters and results, see Groups and Working with Group Parameters and Results.
Grouping Tools
In some cases, it is not possible to create a group. For more information, see the section Restrictions.
- Select the tools you want to combine in a group in the Tool Flow panel.
- Right-click on the tool selection to open the context menu and select "
 Group". Alternatively, you can use the keyboard shortcut Ctrl+G. If it is not possible to group the selected tools due to restrictions, the context menu entry will be grayed out and the keyboard shortcut will not be available.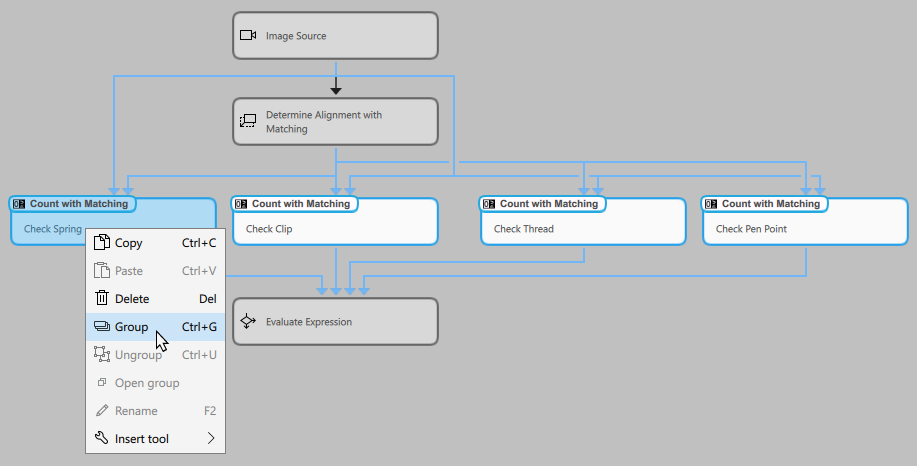
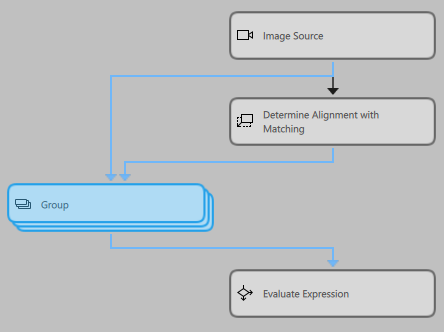
- The selected tools will be replaced in the Tool Flow panel by the new tool group. The group will be inserted at a specific position depending on the selected tools. It is always inserted in the first row of the tool selection at the position where the first tool from the left was placed. In the example image below, this is the position where the tool "Check Spring" was previously placed.
-
You could now also rename the group in the Tool Workspace just like a regular tool. For more information, see Renaming Tools, Parameters, and Results. The group will then be displayed in the Tool Flow panel with the new custom name.
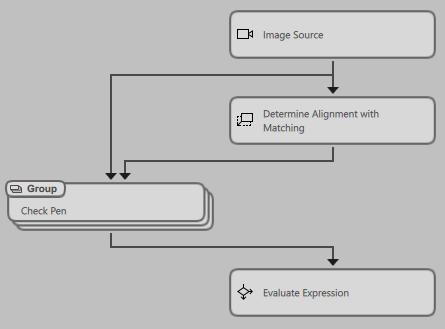
After creating the group, a group tab is added in the Tool Flow. When changing to the respective group tab, some modifications within the group are possible. For more information, see the section Available Configuration Options in the Group Interface on page Working with Group Parameters and Results.
Ungrouping Tools
When tools are ungrouped, the group interface is removed, and the parameters and results can be adjusted directly in the original tools again.
To ungroup the tools, you can proceed as follows:
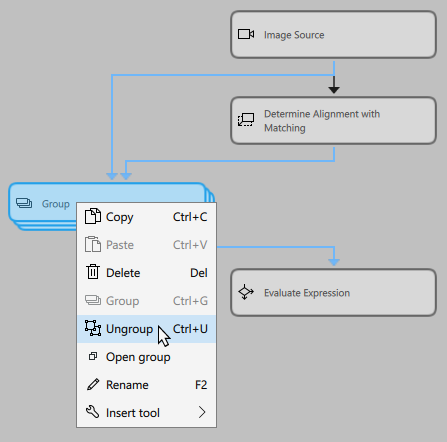
- Right-click on the group in the Tool Flow panel to open the context menu and select "
 Ungroup".
 - Alternatively, select the group and use the keyboard shortcut Ctrl+U.
Restrictions
General Group Restrictions
There are also some restrictions when configuring group parameters and results in the Tool Workspace:
- Only parameters and results that are visible in the group interface can be connected in the Frontend Designer.
- When configuring a group in the Tool Workspace, no processing time is provided.
- Within the group tab, new tools cannot be added to an existing group.
- It is not possible to adjust connections between tools within a group. For this you have to ungroup first.
- The group tab cannot be detached from the Tool Flow panel.
Restrictions for Creating Groups
In some cases, it is not possible to create a group. Then, the respective context menu entry will be grayed out and the keyboard shortcut to create a group will not be available.
- It is not possible to create a group of groups.
- It is not possible to group tools if more than one "easyTouch Button" in the Frontend design is connected to any of the tools in the group-to-be.
- It is not possible to group tools if more than one "Training" widget in the Frontend design is connected to any of the tools in the group-to-be.
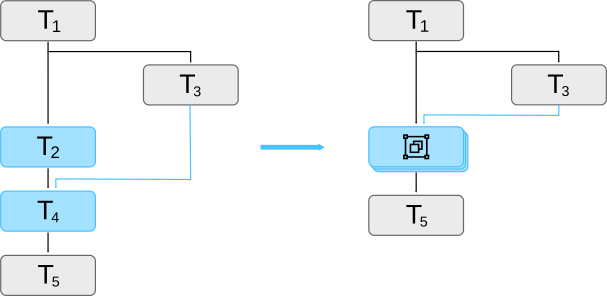
- It is not possible to group tools if any tool connections would be lost when creating the group. A new group is always inserted at the top left of the tool selection. If multiple subsequent tools are selected to be grouped, this might lead to a lost connection, for example, if a tool to be grouped has an incoming connection from a tool that is not to be grouped and the new group would be placed above or next to the connected tool. The following graphic shows an example. A result of tool T3 is connected to a parameter of tool T4. This connection would be lost if the tools T2 and T4 would be grouped because the new group would be placed at the position of the tool T2, next to the tool T3. However, connections are only allowed to previous or subsequent tools and thus the connection between T3 and T4 in the group cannot be kept. Therefore, when selecting the tools T2 and T4, the context menu entry will be grayed out and the keyboard shortcut for grouping will not be available.
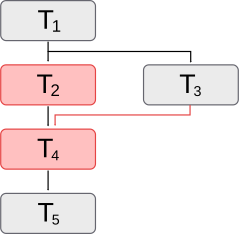
In such cases, rearranging the tools before grouping might help to avoid any loss of tool connections. In this simple example, the tools T2, T4, and T5 could be moved down in the Tool Flow panel. With the new positions, the tools T2 and T4 can now be grouped because the new group will be placed below tool T3 and thus, no connection would be lost.