Customizing the MERLIC Frontend
There are various visualization and customization options for the MERLIC Frontend. Most of these settings can be defined via the INI file of MERLIC or via command line options, but there are also some settings that can be adjusted via the graphical user interface.
You can adjust the INI configuration for the MERLIC Frontend in the default INI file or create a new one for your application. On Windows systems, the default "MERLIC5.ini" file is located in the directory "%APPDATA%\MVTec". On Linux systems, it is expected in the directory "~/.config/MVTec/". Properties for the MERLIC Frontend must be added to the section with label [Frontend]. If the INI file does not contain theses labels yet, you may add them to the file and add the respective settings. For more information, see The MERLIC INI File.
Full Screen Mode
You can activate the full screen mode for the MERLIC Frontend in various ways.
Via Keyboard Shortcut
In the MERLIC Frontend window, press the shortcut F11. To exit the full screen mode press F11 again.
Via the INI File
Open the INI file and set the INI property "StartInFullscreen" in the [Frontend] section to "true". The MERLIC Frontend will then start automatically in full screen mode when the respective INI file is used.
[Frontend]
StartInFullscreen=true
Via Command Line
Start the MERLIC Frontend via command line and use the command line option "‑‑fullscreen".
merlic_frontend.exe --fullscreenDisabling the Title Bar of the MERLIC Frontend
If desired, you can disable the title bar of the MERLIC Frontend. When starting the MERLIC Frontend, the title bar and the respective window title will not be shown. This includes control icons for closing or resizing the window.
Via the INI File
Open the INI file and set the INI property "HideWindowTitleBar" in the [Frontend] section to "true". When starting the MERLIC Frontend with the respective INI file, the title bar of the MERLIC Frontend windows will not be visible.
[Frontend]
HideWindowTitleBar=true
Via Command Line
Start the MERLIC Frontend via command line and use the command line option "". When using this option, make sure to add the desired value "true" or "false".
merlic_frontend.exe --hide_window_title_bar=trueCustomizing the Window Title
By default, the window title of the MERLIC Frontend shows "MVTec MERLIC - Frontend". You can define a different title for an MVApp via the MERLIC Designer.
- Open the MVApp in the MERLIC Creator.
- Start the MERLIC Designer and open the following menu entry: "Edit → Frontend Properties".
- Enter the desired text in the input field of "Frontend Window Title".
- Click on "OK" to confirm your changes.
The new window title is only applied to the respective MVApp. Therefore, you can use this option to define MVApp-specific window titles for the MERLIC Frontend. However, during the time the MERLIC Frontend is being loaded the default window title and a default status message is shown in the Frontend.
Customizing the Frontend Icon
You can define a custom icon for the MERLIC Frontend, for example, your company logo, to customize the MERLIC Frontend for your application. The custom icon will be shown in the title bar of the MERLIC Frontend and at the task bar instead of the default MERLIC icon. Make sure to use an image that fits as icon in terms of size and file format, for example, .ico or .png file.
The custom icon can be defined in the INI file or as command line argument.
Via the INI File
Open the INI file and set the INI property "IconFile" in the [Frontend] section to use the custom icon. You have to define the name and absolute file path of the icon. When starting the MERLIC Frontend with the respective INI file, it will show your custom icon instead of the MERLIC icon.
[Frontend]
IconFile=<FILE_PATH>/<FILENAME>
Via Command Line
Start the MERLIC Frontend via command line and use the command line argument "‑‑icon_file" to define the absolute path and icon file. This option might be useful if you want to change the icon only for a specific remote MERLIC Frontend.
merlic_frontend.exe --icon_file <FILE_PATH>/<FILENAME>Changing the Custom Icon for the Task Bar
Due to restrictions of the Windows operating system, your custom Frontend icon might not be shown in the task bar. Instead, the default icon of MERLIC is shown. To ensure that your custom icon is also used in the task bar, you have to perform the following steps.
You need administrator rights to perform the following steps.
- Make sure there is only one shortcut of the Frontend application on your device and that it is located in the folder " 26.10".
- Right-click on the Frontend shortcut and choose "Properties".
- Click on the button "Change Icon...".
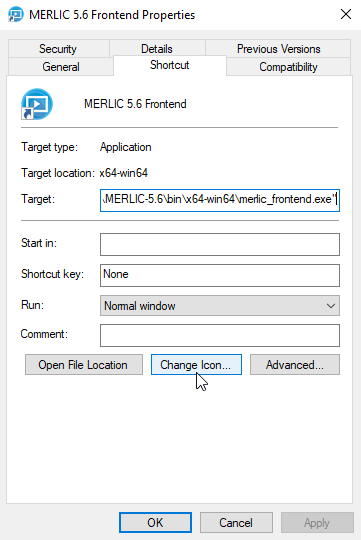
- Choose the icon of your choice via the button "Browse...", then confirm your choice with "OK".
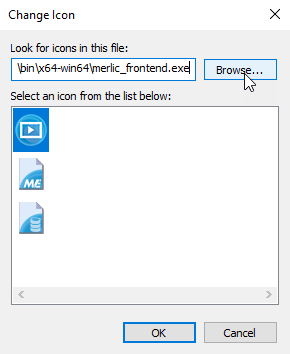
- Click "Apply" in the "Properties" dialog of the shortcut.
- Open the MERLIC Frontend. The task bar now shows your customized Frontend icon.
Alternatively, if you want to use several shortcuts of your Frontend application, you can also change the icon of each shortcut manually. To do so, find all your shortcuts of the Frontend application and follow the instructions starting from the second step of the instructions above.