Acquire Image from Camera
This tools is set as legacy. It still available to provide backward compatibility but it will no longer be maintained or updated in upcoming MERLIC versions. We recommend using the Image Source Manager for the set up of the image acquisition.
This tool can be used to acquire images from a camera device. In contrast to the image acquisition via the Image Source Manager, the following
- The configuration of the camera device is bound to the MERLIC Vision App and cannot be reused in other MVApps. Thus, camera devices must be configured anew in each MVApp.
- Only camera devices can be configured. Peripheral devices such as lighting or lens controllers are not supported in this tool.
- Camera devices cannot be configured for the use with a hardware trigger.
- Only camera devices on the local system can be configured.
- With each execution, an image is acquired only from the camera device that has been configured in the MVApp.
If you still want to use this tool for the image acquisition, the following documentation describes how to use this tool to configure camera devices and acquire images.
License Restrictions
When using this tool, some restrictions apply:
- You may only use as many "Acquire Image from Camera" tools in an MVApp as allowed by the used MERLIC license.
- If an MVApp already contains an "Image Source" tool, it is not allowed to add an "Acquire Image from Camera" tool to the same MVApp and vice versa.
Number of Allowed "Acquire Image from Camera" Tools
|
MERLIC license package |
Allowed number of "Acquire Image from Camera" tools |
Description |
|---|---|---|
|
Small |
1 |
You can use only one "Acquire Image from Camera" tool per MVApp. However, you can add as many "Acquire Image from File" tools as you like. |
|
Medium |
2 |
You can use up to two "Acquire Image from Camera" tool per MVApp. However, you can add as many "Acquire Image from File" tools as you like. |
|
Large and X-Large |
4 |
You can use up to four "Acquire Image from Camera" tool per MVApp. However, you can add as many "Acquire Image from File" tools as you like. |
Supported Image Acquisition Interfaces
MERLIC offers hardware independence by supporting image acquisition interfaces of the latest industry standards GigE Vision, GenICam GenTL, and USB3 Vision. For more information about the respective system requirements, see the topic Supported Image Acquisition Interfaces.
General Information
You can select the desired camera at the parameter "Device". For each execution of your MERLIC application, a single image is acquired from the selected camera device.
In case of camera devices that support GenICam SFNC-conform software trigger, some special features apply. Please refer to the section Using Camera Devices Supporting Software Trigger for more information.
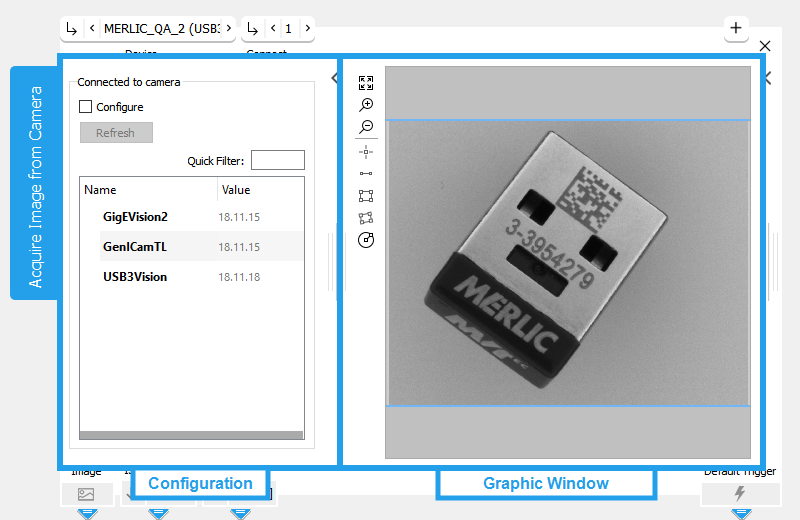
![]() Configuration area
Configuration area
![]() Graphics window
Graphics window
If you want to configure the connected camera, you have to expand the configuration area on the left by clicking the ![]() arrow on the top left corner of the Tool Board. For more detailed information about the configuration of the connected camera, see the section Configuration. If you have finished your camera configuration, you can hide the configuration area again.
arrow on the top left corner of the Tool Board. For more detailed information about the configuration of the connected camera, see the section Configuration. If you have finished your camera configuration, you can hide the configuration area again.
The tool "Acquire Image from Camera" has only been tested with one or two cameras at a time. You might use more cameras at your own risk, but we cannot guarantee a proper operation. If you want to use more than two cameras, we recommend to use the tool Image Source via the MERLIC Image Source Manager (ISM).
If you want to use more than two cameras with the tool "Acquire Image from Camera", you should take into account the following issues in order to ensure a proper operation:
Testing the Camera
To check if your camera is correctly installed, use the following steps:
- Open the tool "Acquire Image from Camera".
- Open the drop-down menu of the parameter Device and select "<search for devices>".
- If the name of your camera appears in the list of devices without any additions that signify a temporal status, it is ready to use.
- If the name of your camera appears in the list of devices with additions that signify a temporal status, please refer to the installation guide of your camera how to set up the necessary drivers etc.
- If your camera does not appear in the list of devices that is ready to use, insure that it is properly installed and not impeded, e.g., by firewalls or anti virus protection.
Parameters
Basic Parameters
Device:
This parameter defines the camera device from which the images are acquired. The tool automatically searches for devices that are connected to your system when the tool is inserted. The available camera devices are then listed in the drop-down menu of this parameter. The list shows the user defined IDs of the available cameras with the respective interface that is used for the camera. In case no user ID has been defined for a camera, the unique camera ID is shown instead.
A camera device may also be listed twice if it is available with the GigEVision2 interface as well as with the GenICamTL interface. If you are using a camera device with GenICam compliant digital I/O devices and want to use the camera as communication device for the process integration mode of MERLIC, you have to select the same acquisition interface in the "I/O" tab of the MERLIC RTE Setup again. For more information about the process integration and the respective setup, see MERLIC Runtime Environment and Camera Device with I/O Channels.
Beside the list of available camera devices, the parameter offers the following options:
|
Value |
Description |
|---|---|
|
<not connected> |
This value is set by default when the tool is inserted. It indicates that currently no camera device is connected. |
|
<search for devices> |
Select this value to update the list of available camera devices. |
|
<use first available camera> |
Select this value to automatically open the first device in the list of available cameras. This may be especially useful if the MERLIC Vision App will run on a different system with an unknown camera. |
Connect:
This parameter determines if the tool shall connect with the selected camera device (= 1, the default setting) or not (= 0).
If you are using a camera device with GenICam compliant digital I/O devices and want to use the camera as communication device for the process integration mode of MERLIC, you have to deactivate the connection to the device to ensure that it can be found during the setup for the process integration. For more information about the process integration and the setup, see MERLIC Runtime Environment and Camera Device with I/O Channels.
Configuration
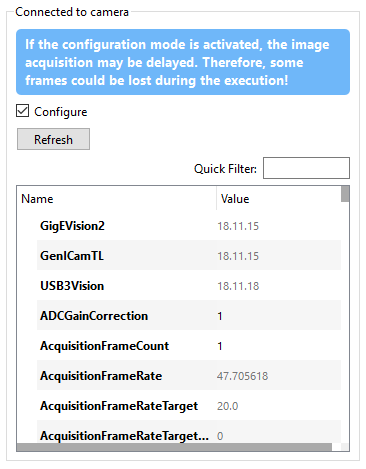
The configuration of the camera can be defined on the area left of the Tool Board. If a camera device is connected and the configuration mode is activated, the list of all camera parameters with the corresponding values is displayed. On top of the parameter list, you can also see the name and version of the currently supported image acquisition interfaces.
In addition to the table with the parameter list, the configuration area contains the following elements:
Check box "Configure":
This check box is required to activate the configuration mode for the camera parameters. In order to display and edit the available camera parameters this check box must be activated.
In the configuration mode, the image acquisition may be delayed compared to an inactive configuration mode. Therefore, we recommend to deactivate the check box before starting the MERLIC Vision App and the image acquisition.
Button "Refresh":
This button refreshes the list of supported camera parameters and their values. This is useful for parameters that have side effects.
Quick Filter:
The Quick Filter enables you to search for a certain camera parameter in the list by its name.
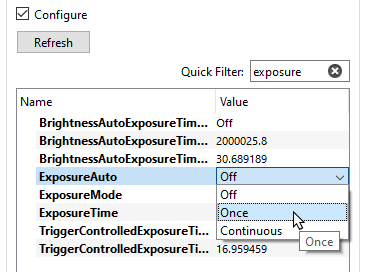
Adjusting the Camera Parameters
To adjust the parameters of your camera, you may proceed as follows:
- Connect the camera device.
- Activate the check box "Configure" to enable the configuration mode for the camera parameters.
- Go to the camera parameters you want to edit and click into the corresponding field of the parameter value.
- Enter the desired value for the camera parameter.
- Optionally, click the button "Refresh" to update the parameter list in case of side effects and make further adjustments.
All changes in the configuration settings are instantly adopted and with each adjustment the tool acquires a single image from the camera device.
If a GigE Vision camera is added as image source, its parameter [Stream]GevStreamAbortCheckPeriod is automatically set to a value of 500 µs to decrease the image acquisition time.
If you are using the deprecated "Acquire Image from Camera" tool for the image acquisition, the following limitation also applies: Some camera devices do not support the save and load functionality for adjustments at the camera configuration. In this case your adjustments for the camera parameters settings cannot be saved in the MERLIC Vision App! If such a device is used, the default camera settings will be restored when the tool is loaded again. However, even if the selected camera device supports the save and load functionality, it still depends on the camera device which of the camera parameters are actually saved.
If a GigE Vision camera is connected in the deprecated "Acquire Image from Camera" tool, its parameter [Stream]GevStreamAbortCheckPeriod is automatically set to a value of 500 µs to decrease the image acquisition time. The value is automatically set each time the camera is loaded, i.e., if the MVApp is loaded. To use a different value, you have to manually adjust the value after loading the MVApp.
Configuration Tips for 3D Sensors
If you are using a 3D sensor to acquire images with 3D height information, you might have to make some general adjustments in the camera configuration to ensure that the required image data can be processed in all tools. In the following, some general configuration tips are described.
Acquiring the Images in the First Channel
- MERLIC tools automatically process the first channel of an image. Therefore, you have to ensure that the desired image, i.e., a height image, a depth image, or a disparity image, is returned in the first channel.
- Check the configuration of the parameters "ComponentSelector" and "ComponentEnable" if the desired component is selected and enabled. Also make sure to deactivate all other components that are not required.
- Check the configuration of the camera parameter "PixelFormat" if the correct pixel format is set.
In case, the configuration could not be adjusted accordingly to retrieve the image in the first channel, you can use the tool Get Color Channels to extract the desired channel.
- In case multiple components are activated, they will be returned in form of images instead of channels.
Further Configuration Tips
- Set the timeout to a suitable value depending on the camera that is used, e.g., for line scan cameras a timeout > 5 s might be required.
- Make sure to check the exposure time and adjust the value if needed.
Please also refer to the topic 3D Height Image to get information about how to preprocess images acquired from a 3D sensor. In addition, you can find additional information about 3D sensor specific configuration on our website.
Using Camera Devices Supporting Software Trigger
In case you want to use this tool to acquire images from a camera device that supports GenICam SFNC-conform software trigger, some special features apply. To achieve higher frame rates, MERLIC automatically activates the software trigger mode for these camera devices. In addition, MERLIC configures several settings automatically if you are using one of these cameras.
The following sections give information about the special features that apply in this case.
Camera Parameter Settings
The following camera parameters are modified automatically by MERLIC to activate the software triggering mode:
|
Camera Parameter |
Value |
|---|---|
|
TriggerSelector |
FrameStart or ExposureStart (if FrameStart not available) |
|
TriggerSource |
Software |
|
TriggerMode |
"On" |
In addition, these parameters are not displayed in the list of configurable camera parameters because they are set by MERLIC. When MERLIC is shut down, they are reset to the respective initial values.
Configuration Mode
Usually, images are grabbed synchronously by MERLIC. If you are using a camera that supports GenICam SFNC-conform software trigger, it depends on the status of the camera configuration mode if images are grabbed synchronously or asynchronously. When you activate the camera configuration mode because you want to adjust some camera parameters, the images are grabbed synchronously. When you deactivate the camera configuration mode because you are finished with your settings, the images are grabbed asynchronously.
Hardware Trigger
If you are using a camera that supports GenICam SFNC-conform software trigger, it is not possible to configure the camera to be triggered by hardware.
If the Image Source Manager is used for the image acquisition, no special features apply and no camera parameters are set automatically by MERLIC.
Results
Basic Results
Image:
This result returns the acquired image from camera.
Is Connected:
This result indicates if the camera device is connected (= 1) or not (= 0).
Tool State:
"Tool State" returns information about the state of the tool and thus can be used for error handling. Please see the topic Tool State Result for more information about the different tool state results.
Additional Results
Processing Time:
This result returns the duration of the most recent execution of the tool in milliseconds. The result is provided as additional result. Therefore, it is hidden by default but it can be displayed via the ![]() button beside the tool results. For more information see the section Processing Time in the tool reference overview.
button beside the tool results. For more information see the section Processing Time in the tool reference overview.

