Simulated PLC as Virtual Device
MERLIC provides a plug-in that connects to a simulated PLC as virtual device, using the same protocol for communication as with a Hilscher card. This virtual device can be utilized for communication simulations independent of the hardware. The simulated PLC can be configured in the "![]() I/O" tab of the MERLIC RTE Setup to execute one of two predefined programs. Both programs can optionally cycle through a list of recipes A MERLIC recipe file is a crucial part for the MERLIC process integration. It is a separate file (with file ending .mrcp) that defines which MERLIC Vision App is loaded for the process integration. It also defines how the MVApp is parametrized because it contains a set of pre-defined input values for selected tool parameters.
You can create multiple recipe files with individual sets of input values for one and the same MVApp. This enables you to reuse an MVApp with different parameter settings for various scenarios of your application. You can also use a recipe file to load an MVApp for a completely different image processing task. by calling "PrepareRecipe" after a certain number of executions, set by the user.
I/O" tab of the MERLIC RTE Setup to execute one of two predefined programs. Both programs can optionally cycle through a list of recipes A MERLIC recipe file is a crucial part for the MERLIC process integration. It is a separate file (with file ending .mrcp) that defines which MERLIC Vision App is loaded for the process integration. It also defines how the MVApp is parametrized because it contains a set of pre-defined input values for selected tool parameters.
You can create multiple recipe files with individual sets of input values for one and the same MVApp. This enables you to reuse an MVApp with different parameter settings for various scenarios of your application. You can also use a recipe file to load an MVApp for a completely different image processing task. by calling "PrepareRecipe" after a certain number of executions, set by the user.
- The first program repeatedly triggers single executions with "StartSingleJob".
- The second program triggers a continuous execution with "StartContinuous" and stops it after a number of executions, set by the user.
For more information, see Commands (Hilscher).
The process of setting-up and running the simulated PLC consists of the following basic steps:
- Import at least one recipe in the "Recipes" tab of the MERLIC RTE Setup. For more information about recipes, see MERLIC Recipe Files.
- Switch to the "I/O" tab and enable the simulated PLC.
- Configure the simulated PLC with the provided parameters and save the changes.
- Start MERLIC in process integration mode, that is, MERLIC RTE, as described in Starting and Stopping MERLIC RTE.
The available parameters for the configuration of the simulated PLC are described in more detail in the section Configuring the Simulated PLC.
Information about the data communication will be added to the log file "merlic_rte_*.log" according to your logging settings. The recommended logging setting for the simulated PLC is "trace". For more information, see Logging.
Enabling the Simulated PLC
First, you have to select and enable the simulated PLC in the MERLIC RTE Setup:
- Open the MERLIC RTE Setup and go to the "I/O" tab.
- Click on "
 Refresh" to update the list of available I/O devices. For more information, see Setting Up I/O Devices.
 - Select the simulated PLC and enable it via double-click or by clicking the "
 Enable device" button.
After enabling the I/O device, the respective configuration of the device will be shown on the right. MERLIC provides a default configuration for the simulated PLC and displays it at the right side of the MERLIC RTE Setup.
Configuring the Byte Order
Choose the byte order for the data communication.
- Select the simulated PLC in the list of devices.
- Click on the drop-down menu for "Byte Order" and select the desired value:
- LittleEndian
- BigEndian
- Save the configuration.
The new byte order will be saved in the MERLIC5.ini. In the log file "merlic_rte_*.log", you can see how the byte order of your choice influences the order of bytes that are sent.
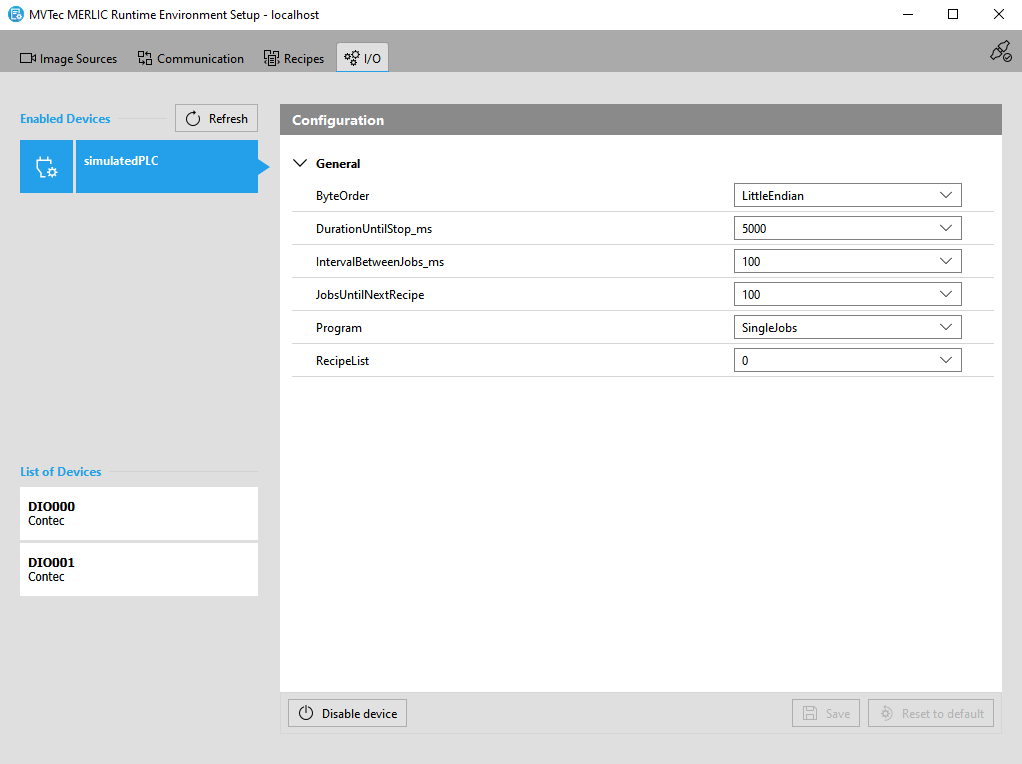
Configuring the Simulated PLC
To configure the simulated PLC for your test, make sure that the simulated PLC is enabled and selected in the "I/O" tab of the MERLIC RTE Setup. The available parameters will be displayed on the right in the configuration area. Here, you can select the recipes you want to test, the execution mode, i.e., single execution or continuous execution, and some further parameters such as the byte order or various time values, e.g., to determine when the next recipe is loaded.
The following table gives an overview of the available parameters.
|
Parameters |
Description |
Value range |
|---|---|---|
|
ByteOrder |
The byte order for the data communication. In the log file "merlic_rte_*.log", you can see how the byte order of your choice influences the order of bytes that are sent. |
LittleEndian BigEndian |
|
DurationUntilStop_ms |
This parameter is relevant only for continuous executions, i.e., if "ContinuousJobs" is selected for the parameter "Program". It defines how long the continuous execution will continue until a stop signal is sent. The duration is defined in ms. Example: If this parameter is set to 5000, the continuous execution of the MERLIC Vision App that is referenced in the recipe is stopped after 5000 ms. |
5000, 1000, 10000 |
|
IntervalBetweenJobs_ms |
This parameter defines the time interval between two jobs, i.e., the time between two "SingleJobs" or two "ContinuousJobs". It is defined in ms. Example: If this parameter is set to 100 and "SingleJobs" is selected for the parameter "Program", MERLIC will wait 100 ms after each single execution until the next one is started. |
100, 0, 5000 |
|
JobsUntilNextRecipe |
This parameter defines the number of jobs that will be executed until the next recipe is loaded from the list of recipes defined in the parameter "RecipeList". The recipe is changed only if more than one recipes have been selected in "RecipeList". |
100, 1, 10 |
|
Program |
This parameter enables you to select the execution mode. In case of "SingleJobs", a sequence of single executions will be performed and in case of "ContinuousJobs" a sequence of continuous executions is performed. When starting the MERLIC process integration mode with the simulated PLC, the execution of the "SingleJobs" or "ContinuousJobs", respectively, is performed depending on the configuration of the other parameters: In case of "SingleJobs", the internal steps for the execution are as follows:
In case of "ContinuousJobs", the internal steps for the execution are as follows:
|
SingleJobs ContinuousJobs |
|
RecipeList |
This parameter defines the IDs of the recipes that will be used. The recipes are given in a comma separated list with the respective recipe IDs. The selected recipes will be alternated during the execution. You can select to alternate between up to 4 recipes. The time when the recipe is changed is determined by the parameter "JobsUntilNextRecipe". In case, it is set to 10, the next recipe from the recipe list will be prepared after the currently prepared recipe has been executed for 10 jobs ("SingleJobs" or "ContinuousJobs") and so on. If the list contains only one recipe ID, this recipe will be prepared only once and all jobs will be executed with this recipe. If the list is empty, all jobs are executed with the prepared default recipe or, if not available, with the recipe 0. |
0 0,1 0,1,2 0,1,2,3 |
The configuration is automatically added to the MERLIC5.ini file. Therefore, it is not necessary to adapt the INI file manually.
Resetting the Configuration
To restore the default configuration for your device, you can reset the changes by clicking on "![]() Reset to default" at the bottom of the "I/O" tab.
Reset to default" at the bottom of the "I/O" tab.