Detect Anomalies
Use this tool to detect anomalies in images.
This tool is used with a training mode. This means that first a training is performed based on the selected samples of training images with and without anomalies and specified training parameters. Training images with "bad" samples, i.e., images that show anomalies, are not required but they can help to improve the deep learning model.
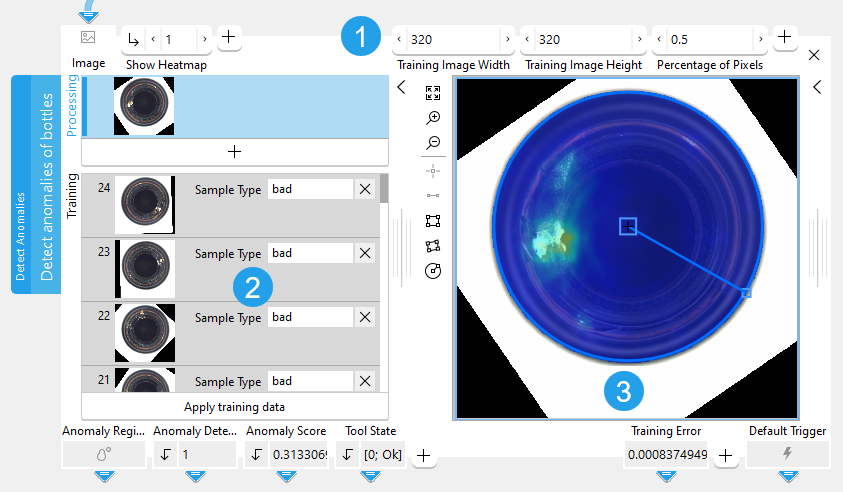
The tool provides a training area on the left of the Tool Board. It enables you to switch between the processing mode for the anomaly detection and the training mode for training the deep learning model. The graphics window will display the image of the currently active mode which is highlighted in blue in the training area. In addition to the search parameters on the top left, the tool provides further parameters for the training on the top right of the tool.
See the topic Working with the Training Mode to learn more about how to work with tools that require a training.
The Tool Board is split into the training area on the left of the and the graphics window on the right.
![]() Training parameters
Training parameters
![]() Training area
Training area
![]() Graphics window
Graphics window
Shown Images
The training section shows the processing image and the training images.
- The processing image: the current "Image" received from a previous tool.
- Training images: the images that are used for the training of the deep learning model. You can use training images with two different sample types: "good" for images without anomalies and "bad" for images with anomalies.
Training
Training Images
About 20 - 100 images are enough to train the model. The training images may contain only "good" samples, i.e., images without any anomalies. However, training images with "bad" samples, i.e., images that show anomalies, can help to improve the deep learning model.
To add an image as training image, use the following steps:
- Run the application step by step via the "Run Once" button or via the shortcut F6 until an image is shown that you want to use as training image.
- Add the current image to the set of training images by clicking on the
 button or by using the shortcut F3.
 - Set the desired sample type for each training image, e.g., either "good" or "bad".
- To add further training images, repeat the previous steps again.
Perform the Training
To perform the training, use the following steps:
- Define the sample type for each training image:
- "good": for images without anomalies
- "bad": for images with anomalies
- If required, adjust the training parameters at the top right of the tool to your training data.
- Click on the button "Apply training data" to perform the training.
After performing the training, the tool automatically switches to the processing mode and you can check if your trained model works fine for the processing images or if you need to adjust the search parameters.
Checking the Trained Data
The training parameters are automatically adjusted to the defined training images. The search parameters "Anomaly Region Threshold" and "Anomaly Score Threshold" on the left side are also automatically set during the training.
Run the application with a series of images and you can instantly check in the graphics window if the anomaly detection works correctly with the trained deep learning model. If necessary, you can make further adjustments at the training parameters or the search parameters.
Support of Artificial Intelligence Acceleration Interfaces (AI²)
MERLIC comes with Artificial Intelligence Acceleration Interfaces (AI²) for the NVIDIA® TensorRT™ SDK and the Intel® Distribution of OpenVINO™ toolkit. Thus, you can use AI accelerator hardware as processing unit that is compatible with the NVIDIA® TensorRT™ or the OpenVINO™ toolkit to perform optimized inference on the respective hardware. This way, you can achieve significantly faster deep learning inference times. The respective hardware can be selected at the tool parameter "Processing Unit".
For more detailed information on the installation and the prerequisites, see the topic AI² Interfaces for Tools with Deep Learning.
Parameters
Basic Parameters
Image:
This parameter represents the image in which anomalies should be detected.
Show Heatmap:
This parameters defines if the heatmap is shown or not. The heatmap visually indicates the anomalies in the image. The default setting is 1. This means that the heatmap is shown by default. If the parameter is set to 0, the heatmap is not visible. The value of this parameter also determines if the heatmap is part of the image that is returned in the result "Displayed Image".
Additional Parameters
Processing Region:
This parameter defines the region for processing. Image parts outside of the union of the ROI and "Processing Region" are not processed. In addition, if either of them is empty, the image part inside of the other one is processed. In case both of them are empty, the whole image is processed.
By default, "Processing Region" is defined as empty region. To specify a "Processing Region", you have to connect the parameter to an appropriate region result of a previous tool to make sure that a region is transmitted to this tool.
ROI:
This parameter defines the region of interest (ROI) for processing. Image parts outside of the union of the ROI and "Processing Region" are not processed. In addition, if either of them is empty, the image part inside of the other one is processed. In case both of them are empty, the whole image is processed.
By default the ROI is defined as an empty ROI. If you want to use a non-empty ROI for the processing, you either have to connect the parameter to an appropriate ROI result of a previous tool or you have to draw new ROIs into the image using the available ROI buttons.
Anomaly Region Threshold:
This parameter defines at which threshold value a pixel in the image belongs to an anomaly or not. The parameter is set to 0.5 by default. The optimal threshold is determined during the training. However, if the threshold set by the deep learning model is not optimal, this parameter allows some fine tuning.
Anomaly Score Threshold:
This parameter defines at which threshold value the image is counted as an anomaly image or not. The parameter is set to 0.5 by default. The optimal threshold is determined during the training. However, if the threshold set by the deep learning model is not optimal, this parameter allows some fine tuning.
If the result "Anomaly Score" is greater than the value that is set in the parameter "Anomaly Score Threshold", the result "Anomaly Detected" is set to 1.
Processing Unit:
This parameter defines the device used for processing the images. The parameter is set to "auto" by default. In this mode, MERLIC tries to choose a suitable GPU as processing unit because it usually performs better than the CPU. However, this requires at least 4 GB of available memory on the respective GPU. If no suitable GPU is found, the CPU is used as fallback.
You can also choose the processing unit manually. Click on the parameter to select the device from the list of all available processing units. If you are choosing a GPU as processing unit, we recommend to check that enough memory is available for the used deep learning model. Otherwise, undesirable effects such as slower inference times might occur.
MERLIC also supports the use of AI accelerator hardware that is compatible with the NVIDIA® TensorRT™ SDK or the OpenVINO™ toolkit:
- NVIDIA® GPUs
- CPUs, Intel® GPUs, Intel® VPUs (MYRIAD and HDDL) with support of the OpenVINO™ toolkit
The respective devices are marked either with the prefix "TensorRT(TM)" or "OpenVINO(TM)". If you select a device that supports NVIDIA® TensorRT™ or the OpenVINO™ toolkit, the memory will be initialized on the device via the respective plug-in for the AI² interface.
As soon as an AI accelerator hardware has been selected as processing unit, the optimization of the deep learning model is started. After the optimization, all parameters that represent model parameters will be internally set to read-only. Thus, their values cannot be changed anymore as long as the selected AI accelerator is used as processing unit. To change the parameters, you first have to change the processing unit to a different one without any AI acceleration. After setting the parameters, you can set the processing unit back to the respective AI accelerator hardware.
CPUs with support of the OpenVINO™ toolkit can be used without any additional installation steps. They will be automatically available in the list of available processing units. If multiple processing units with the same name are available, an index number is assigned to their name. The same applies to GPUs with support of the NVIDIA® TensorRT™.
To use GPUs and VPUs with the support of the OpenVINO™ toolkit as processing unit, the Intel® Distribution of OpenVINO™ toolkit must be installed on your computer and MERLIC must be started in an OpenVINO™ toolkit environment. See the topic AI² Interfaces for Tools with Deep Learning for more detailed information on the prerequisites.
Besides the optimization via AI accelerator hardware, MERLIC supports further dynamic optimizations via the NVIDIA® CUDA® Deep Neural Network (cuDNN). This optimization can be enabled via the MERLIC preferences in the MERLIC Creator. For more information, see the topic MERLIC Preferences.
Precision:
This parameter defines the data type that is used internally for the optimization of the deep learning model for inference, i.e., it defines the precision to which the model is converted to. It is set to "high" by default.
The following table shows the model precisions which are supported in this tool.
|
Value |
Description |
|---|---|
|
high |
The deep learning model is converted to a precision of "float32". |
|
medium |
The deep learning model is converted to a precision of "float16". |
Most processing units support both types of precisions. However, there might be some processing units that support only one of these precisions. In this case, only the supported precision will be available at the parameter as soon as the respective device has been selected at the parameter "Processing Unit". If the processing unit is selected automatically, i.e., if "Processing Unit" is set to "auto", only the precision "high" is available.
Training Parameters
Basic Training Parameters
Training Image Width:
This parameter defines the width of the images used for training. The parameter is set to 480 px by default. To speed up the training, you can down-scale the image width.
This parameter must be set to a multiple of 32.
Training Image Height:
This parameter defines the height of the images used for training. The parameter is set to 480 px by default. To speed up the training, you can down-scale the image height.
This parameter must be set to a multiple of 32.
Percentage of Pixels:
This parameter defines the fraction of each image used for training. The parameter is set to 0.25 by default. This means that 25% of the pixels in the training images are used for the training. The training result might be improved by increasing the value but this also increases the training time.
Additional Training Parameters
Model Size:
This parameter defines the pre-trained model used for training. By default, "medium" is selected. You can also set the parameter to "large" to use a large model. However, we recommend to always start with the default model and to use the "large" model only if you are not convinced by the performance with the "medium" model. The main differences between these two models are their required memory size and run time.
Image Complexity:
This parameter describes the capability of the model to handle complex images. The parameter is set to 15 by default. A higher value can improve the performance but increases the time needed to train the model.
Maximum Number of Epochs:
This parameter defines the maximum number of training cycles through the full training data set. The parameter is set to 15 by default. In case the error threshold specified by the training parameter "Training Error Threshold" is reached in an earlier epoch, the training will terminate.
Training Error Threshold:
This parameter is a termination criterion for the training. The parameter is set to 0.001 by default. The training will terminate successfully, as soon as the training error falls below the specified error threshold. The training error is also returned as a training result.
Regularization Noise:
This parameter can be set to regularize the training in order to improve robustness. The parameter is set to 0.0 by default. This means that no regularization noise is created. In case the training fails, setting a higher value might help.
Results
Basic Results
Anomaly Region:
This result represents the region consisting of all the pixels that are regarded as an anomaly.
Anomaly Detected:
This results indicates whether the image contains an anomaly or not. The result value is 1 if the image contains an anomaly. Otherwise, the result value is 0.
Anomaly Score:
This result indicates how likely the entire image is to contain an anomaly.
Tool State:
"Tool State" returns information about the state of the tool and thus can be used for error handling. Please see the topic Tool State Result for more information about the different tool state results.
Additional Results
Used Processing Unit:
This result returns the processing unit that was used in the last iteration. You can use this result to check which processing unit was actually used if the parameter "Processing Unit" is set to "auto" or to check that the correct one was used.
Precision Data Type:
This result returns the data type that was used internally for the optimization of the deep learning model for inference. You can use this result to check if the correct precision was used in case any problems occur.
If the parameter "Precision" is set to "high", the deep learning model should be converted to a precision of "float32". Therefore, this result is expected to return the data type "float32". If the parameter "Precision" is set to "medium", the deep learning model should be converted to a precision of "float16". In this case, the expected value for this result is the data type "float16". In case any problem occurred during an iteration of your MVApp, you could check if this result returns a different data type than expected and also have a look at the log file for more information. See the topic Logging for more information about the log files.
Processing Time:
This result returns the duration of the most recent execution of the tool in milliseconds. The result is provided as additional result. Therefore, it is hidden by default but it can be displayed via the ![]() button beside the tool results. For more information see the section Processing Time in the tool reference overview.
button beside the tool results. For more information see the section Processing Time in the tool reference overview.
Heatmap:
This result represents the heatmap as an image which indicates the anomalies visually.
Displayed Image:
This result represents the overlay of the processing image and the anomaly heatmap. As the processing image shows through the heatmap, you can see more clearly what the anomaly is and where it occurs in the image. However, the heatmap is only shown if the parameter "Show Heatmap" is set to 1. If "Show Heatmap" is set to 0 the resulting image returns only processing image without heatmap.
Training Results
Basic Training Results
Training Error:
This result returns the best error received during training.
Additional Training Results
Anomaly Region Threshold Out:
This result returns the threshold that is needed to determine anomaly regions within the image. The result value is also the input parameter "Anomaly Region Threshold" for the processing step.
Anomaly Score Threshold Out:
This result returns the threshold that determines whether the image is counted as anomaly image or not. The result value is also the input parameter "Anomaly Score Threshold" for the processing step.
Application Examples
This tool is used in the following MERLIC Vision App examples:
- detect_anomalies_of_bottles.mvapp
- classify_and_inspect_wood.mvapp

