Connecting the MERLIC Frontend to a Remote Server
MERLIC offers various ways to connect a MERLIC Frontend to a MERLIC instance running on a remote system. You can connect via the graphical user interface of the MERLIC Frontend, via command line options, or by defining the respective settings in the INI configuration file.
To enable a remote connection, you need to specify the MERLIC server and the MERLIC instance to which the Frontend should connect to. A MERLIC server is part of the MERLIC core The processing unit of a running MERLIC Vision App. that was started on a host machine.
Prerequisites
To enable a remote connection, the following prerequisites must be fulfilled:
- MERLIC must be installed on both the local system and the remote system.
- The MERLIC Directory Agent must be configured to enable remote connections. These are only possible if the TCP server is activated. For more information, see MERLIC Directory Agent and Setting Up Remote Connections.
- On the remote system, MERLIC RTE must be running.
- The maximum number of allowed simultaneous connected MERLIC Frontends is not exceeded.
Compatibility of Frontend connections between MERLIC 26.10 and older versions
For connection between MERLIC Frontends of MERLIC 26.10 and MERLIC RTE instances of MERLIC 26.03 (or older), the legacy connection settings via "‑‑tcp" or the respective INI settings "Host" and "Port" must be used. Otherwise, no connection can be established to MERLIC instances of previous versions.
Connections between MERLIC Frontends of previous MERLIC versions and MERLIC RTE instances of MERLIC 26.10 are not possible.
Connecting via the MERLIC Frontend Menu
This option is only available if the menu bar of the MERLIC Frontend is activated for the currently loaded MERLIC Vision App (MVApp).
- In the Frontend menu bar, click on the menu entry "Access" and select "
 Connect to instance...". Alternatively, click on the button on the right of the Frontend menu.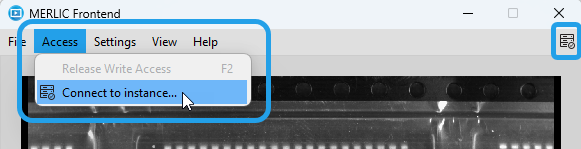
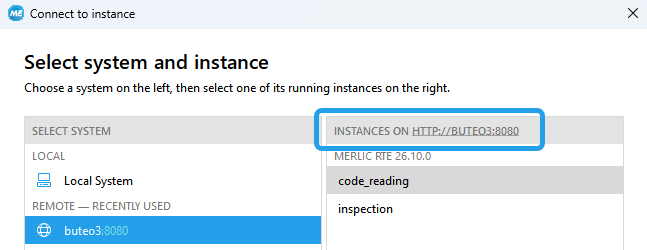
- Select the system you want to connect to. MERLIC automatically lists systems that were previously used.
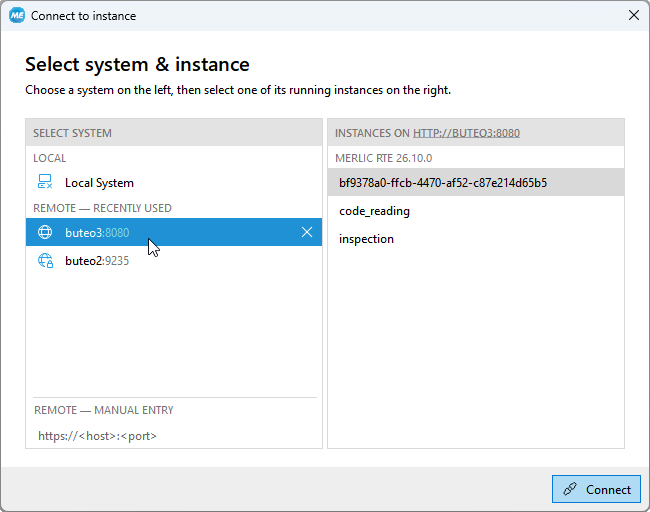
The icon next to the hostname indicates the connection status and the required security level for the connection with this instance.
Icon
Description

MERLIC instance on the local system is available for connection via Unix-domain sockets (UDS).

MERLIC instance is available for connection via unencrypted WebSocket connection. 
MERLIC instance is available for connection via TLS-encrypted WebSocket connection. The instance can only be connected if the required certificates are provided. You can also enter the hostname and port manually if the desired system is not listed. The port must match the one defined in the MERLIC Directory Agent configuration on the desired system. For more information, see Configuring the Directory Agent for Remote Connections.
- Select the MERLIC instance on the right. The list shows only MERLIC instances that are available for connection on the selected system. For remote systems, it shows only MERLIC RTE instances that are currently running on the selected system and whose services are exposed via the specified port. For the local system, also MERLIC Creator instances will be shown.
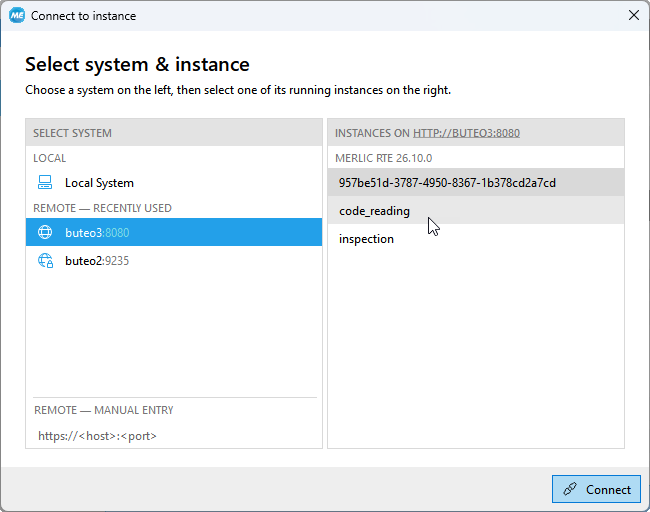
- Confirm your selection with "Connect".
HTML Overview
You can also use the connection dialog to open an HTML overview in a browser to access detailed information on the available MERLIC instances and their services on the selected system.
Click the link above the instance list to open the page in the browser. For more information, see HTML Overview of MERLIC Instances.
Connecting via the Command Line
When starting a MERLIC Frontend via the command line, you can use the command line option "‑‑url" to specify the desired remote system and MERLIC instance you want to connect to. In detail, the URLs need to specify the following information:
|
Component |
Description |
|---|---|
|
URL scheme |
Defines the protocol used for the connection. For connections without Transport Layer Security (TLS) encryption, "ws://" is "http://" are required. For connections with TLS encryption, "wss://" is "https://" are required. If you are not sure, whether the desired MERLIC server requires TLS-encrypted connections, check the configuration of the MERLIC Directory Agent on the respective MERLIC server. For more information, see MERLIC Directory Agent and Setting Up Remote Connections. |
|
HOST |
Defines the hostname or IP address of the MERLIC server. For TLS-encrypted connections, the specified hostname must match the CN value or one of the "subjectAltName" (SAN) values of the server certificate. |
|
PORT |
Defines the port to which the server listens. The port must be the same as specified for the TCP server in the configuration of the MERLIC Directory Agent. Defining a port in the connection URL is optional. However, if no port is specified, it is assumed that the conventional HTTP(S) port is set in the configuration of the Directory Agent. For configurations without TLS-encryption, this would be port 80 for HTTP, and for TLS-encrypted connections, this would be port 443 for HTTPS. If a different port is set in the Directory Agent configuration and the connection URL is given without port number, the MERLIC Frontend will not be able to connect and an error occurs. For example, if the Directory Agent of the system you want to connect to is configured for TLS-encrypted connections, and the port in the Directory Agent configuration is set to 443, you can omit the port number in the connection URL. However, if a different port is set, you must not omit the port number. Keep in mind that some ports might be reserved and privileged only for users with the respective capabilities. For example, the ports 0 - 1023 are privileged ports on Linux. |
|
PATH/INSTANCE_NAME |
Defines the path and name of the MERLIC instance. The "PATH" placeholder usually needs to be replaced with "instances". Only when using a reverse proxy, the path component might differ. For more information, see section Using a Reverse Proxy. |
If all required information is available, you can start a MERLIC Frontend via command line and specify the desired MERLIC server and MERLIC instance for the connection.
- Open a command prompt and change to the "bin\<ARCH>" directory within the MERLIC installation directory, for example, "%PROGRAMFILES%\MVTec\MERLIC-26.10\bin\x64-win64" on a Windows system.
- Use the following command and URL format to start the MERLIC Frontend with a connection to the desired system.
- For connections without TLS encryption:Copy
merlic_frontend.exe --url ws://<HOST>[:<PORT>]/instances/<INSTANCE-NAME>Alternatively, you can use "http://" instead of "ws://".
- For TLS-encrypted connections:Copy
merlic_frontend.exe --url wss://<HOST>[:<PORT>]/instances/<INSTANCE-NAME>Alternatively, you can use "https://" instead of "wss://".
- For connections without TLS encryption:
The MERLIC Frontend will start and automatically connect to the remote system and MERLIC instance that is specified in the URL. If your INI file already specifies a connection URL, it will be ignored. Instead, the URL given in the command line will be used.
You can combine the "‑‑url" option with further command line options, for example, to specify an INI file. For more information on the available command line options for "merlic_frontend.exe", see the section Starting the MERLIC Frontend via the Command Line on page Starting the MERLIC Frontend on Windows.
Example
On a Windows system, an example URL for a remote connection with TLS-encryption may look like this:
merlic_frontend.exe --url wss://merlic-server:8443/instances/instance-runtimeThe MERLIC Frontend will start and automatically connect to the MERLIC instance with name "instance-runtime" that is running on the remote system with hostname "merlic-server" via the port 8443.
Using a Reverse Proxy
If a reverse proxy is used to re-route the HTTP server of the MERLIC Directory Agent, the WebSocket URL has to be adjusted accordingly.
Example
merlic_frontend.exe --url wss://edge-device.local/apps/merlic/instances/instance-runtimeDefining Connection Settings in the INI Configuration File
You can use the INI configuration file of MERLIC to specify the MERLIC server and MERLIC instance to which the MERLIC Frontend tries to connect to. This might be useful if you want to repeatedly connect to a specific MERLIC instance on a remote system without the need to specify the connections settings for each session anew. If the INI file contains connection settings for the MERLIC Frontend, these settings will be used by default when starting the MERLIC Frontend.
You can set the desired MERLIC server and MERLIC instance in the INI file under the [Frontend] section with the INI option "Url". Keep in mind, that the connection settings defined in the INI file will be ignored if the MERLIC Frontend is started via command line with the corresponding "‑‑url" option.
Example
An example configuration of the connection settings within the INI file may look like this:
[Frontend]
Url=wss://merlic-server:8443/instances/instance-runtime
For more information on the available configuration settings, see Configuring the Frontend and Frontend Server.
Using the Default "MERLIC5.ini" INI File
If you define the setting for the remote connection in the "MERLIC5.ini" file, it will be automatically used when starting a MERLIC Frontend via the Windows start menu or via command line. There is no need to define the respective connection URL or the INI file in the command line:
merlic_frontend.exeUsing an Additional INI File
If you define the settings in a different INI file, you have to start the MERLIC Frontend via command line and specify the respective INI file via the command line option "‑‑ini".
merlic_frontend.exe --ini <FILENAME>.iniFor more information on additional INI files, see the section Using Additional INI Files on page The MERLIC INI File.
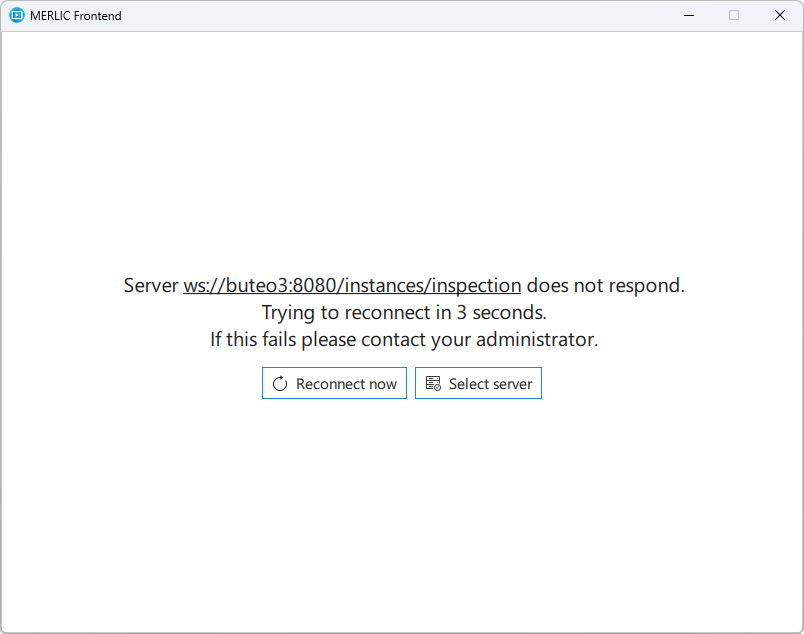
Reconnecting the Server
In some cases, the connection to the selected MERLIC server might be lost and the Frontend of the respective MERLIC Vision App is not available anymore. To re-establish the connection to the server, ensure that all prerequisites are fulfilled and try to connect again. You can either try to reconnect to the previous server with "Reconnect now", or you can use the "Select server" button to select a different server.