Adjusting Camera Parameters
To enable the configuration options for a specific camera device, you have to activate the configuration in which the image source is stored. Only then it is possible to configure the camera parameters of a specific image source or to use the preview mode for its image files. After activating the configuration and selecting a camera device to configure, you can now adjust the parameter of your selected camera device according to your needs.
There are two different ways to adjust camera parameters, which coincide with the two tabs in the "Camera Parameters" section on the right of the "Image Sources" tab: "EasyParams" and "All Parameters". If they are available for your camera device, the MVTec EasyParams in the "EasyParams" tab are shown by default. They provide easy access to the most important and most used camera features at a glance. You can find all of the camera parameters of your camera device in the "All Parameters" tab.
MVTec EasyParams
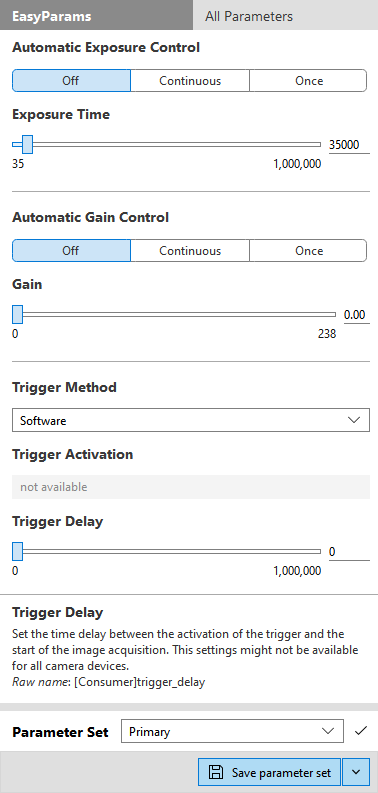
The tab "EasyParams" shows a preselection of the most important and most used camera features, called MVTec EasyParams. This allows easy access to the most important camera features without having to search for the respective parameters in the "All Parameters" tab. However, the EasyParams are based on the regular camera parameters of your camera device. Thus, if an EasyParam is not supported by your camera device, it will not appear in the parameter list of the "EasyParams" tab.
The MVTec EasyParams and their names are defined by MVTec. It is possible that a camera device provides the same parameters under a different name. In this case, a parameter can be found under two different names, once in the "EasyParams" tab and once in the "All Parameters" tab. Some EasyParams combine several camera parameters from the "All Parameters" tab into one EasyParam. For example the EasyParam "Trigger Method" combines the camera parameters "Trigger Mode", "Trigger Selector", and "Trigger Source".
There is a total of seven EasyParams available. If the "EasyParams" tab of your image source displays less than seven parameters, your camera device does not provide the required camera parameters that the missing EasyParams are based on. If any of the EasyParams are grayed out, they cannot be configured due to the current configuration of other EasyParams or other camera parameters.
A special feature of the EasyParams is that they are persistent. This means that you can save all your configurations on the "EasyParams" tab. This even applies to parameters that usually are not persistent for your camera device.
Because the EasyParams are based on the camera parameters available in the tab "All Parameters", changing the values of the EasyParams will also change the values of their equivalent parameters in the "All Parameters" tab. To configure your image source, you can adjust the camera parameters on both the "EasyParams" tab and the "All Parameters" tab. You will not lose your changes if you switch between the two tabs. However, your changes will only be persistent if you save the camera parameter settings. Fore more information about saving the camera parameters, see the topic Saving Parameters of Cameras or Peripheral Devices.
If you hover over an EasyParam, you can find a short help text with a description of its function at the bottom of the "EasyParams" tab. To display the help text for an EasyParam permanently, you can click on its name.
All trigger related MVTec EasyParams are based on the trigger selector "FrameStart" (or "ExposureStart" if "FrameStart" is not available). If you would like to use a trigger selector other than "FrameStart", you need to configure the trigger related camera parameters in the "All Parameters" tab.
Available MVTec EasyParams
Automatic Exposure Control
This parameter specifies whether the EasyParam "Exposure Time" is set manually by the user or automatically by the camera. Make sure to start the live mode first via the button "![]() Start live image" when configuring this parameter.
Start live image" when configuring this parameter.
|
Value |
Description |
|---|---|
|
Off |
The value of the parameter "Exposure Time" is set manually by the user and never adjusted automatically. |
|
Continuous |
The value of the parameter "Exposure Time" is updated automatically and continuously by the camera with every acquired image. |
|
Once |
The value of the parameter "Exposure Time" is automatically estimated by the camera device, but only once. The value is automatically reset to "Off" after the "Exposure Time" value has been estimated. |
This EasyParam depends on the camera parameter "Exposure Mode". If it is grayed out, try setting the camera parameter "Exposure Mode" in the "All Parameters" tab to "Timed".
Exposure Time
This parameter specifies the exposure time. Usually the exposure is specified in microseconds. However, there are cameras that deviate from this standard. Consult the documentation of your camera for more detailed information.
This EasyParam depends on the camera parameter "Exposure Mode". If it is grayed out, make sure that the EasyParam "Automatic Exposure Control" is set to "Off" and then try setting the camera parameter "Exposure Mode" in the "All Parameters" tab to "Timed".
Automatic Gain Control
This parameter specifies whether the EasyParam "Gain" is set manually by the user or automatically by the camera. Make sure to start the live mode first via the button "![]() Start live image" when configuring this parameter.
Start live image" when configuring this parameter.
|
Value |
Description |
|---|---|
|
Off |
The value of the parameter "Gain" is set manually by the user and never adjusted automatically. |
|
Continuous |
The value of the parameter "Gain" is updated automatically and continuously by the camera with every acquired image. |
|
Once |
The value of the parameter "Gain" is automatically estimated by the camera device, but only once. The value is automatically reset to "Off" after the "Exposure Time" value has been estimated. |
Gain
This parameter controls the selected gain as an absolute physical value. This value may vary from camera to camera. Consult the documentation of your camera for more detailed information.
Trigger Method
This parameter specifies the mode how the image acquisition will be triggered.
|
Value |
Description |
|---|---|
|
Software |
This value specifies that MERLIC will be triggering the image acquisition. |
|
Hardware |
This value specifies that the hardware of the camera device will be triggering the image acquisition. The term "Hardware" functions as a placeholder for "Line<x>", e.g., Line1. If you would like to work with a different kind of hardware trigger you need to configure the hardware trigger in the "All Parameters" tab. |
|
Off |
This value specifies that the camera device will be acquiring images continuously without a specific trigger. This option could slow down the processing time of your MVApp. |
Find out more about the different trigger options in the topic Configuring Triggers for the Image Acquisition
The EasyParam "Trigger Method" combines three different camera parameters: "Trigger Mode", "Trigger Selector", and "Trigger Source". Selecting a "Trigger Method" in the "EasyParams" tab leads to these actions: The camera parameter "Trigger Selector" is set to "FrameStart" (or "ExposureStart", if "FrameStart" is not available) and when the corresponding "Trigger Source" is selected, the"Trigger Mode" is set to "On".
Trigger Activation
This parameter specifies the activation mode of the hardware trigger. If the EasyParam "Trigger Method" is set to anything other than "Hardware", this parameter is grayed out.
|
Value |
Description |
|---|---|
|
RisingEdge |
Specifies that the trigger is considered valid on the rising edge of the source signal. |
|
FallingEdge |
Specifies that the trigger is considered valid on the falling edge of the source signal. |
|
AnyEdge |
Specifies that the trigger is considered valid on the falling or rising edge of the source signal. |
|
LevelHigh |
Specifies that the trigger is considered valid as long as the level of the source signal is high. |
|
LevelLow |
Specifies that the trigger is considered valid as long as the level of the source signal is low. |
Trigger Delay
This parameter specifies the delay that should apply after the trigger has been received before activating the image acquisition. Usually the delay is specified in microseconds. However, there are cameras that deviate from this standard. Consult the documentation of your camera for more detailed information.
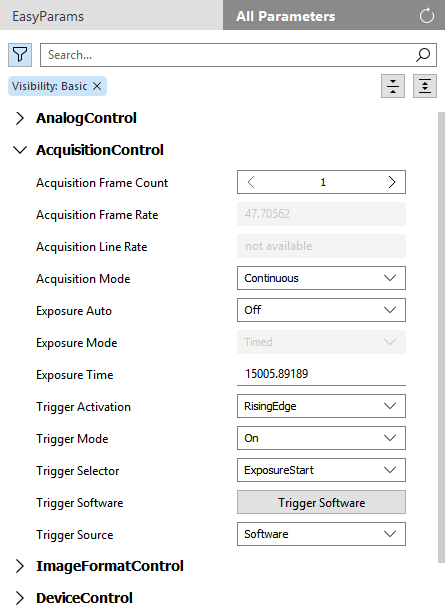
All Parameters
In the tab "All Parameters", all available camera parameters of the selected camera device are listed. You can expand and collapse the parameter categories to show or hide the respective parameter with its values.
To adjust the value of a camera parameter, you can simply use the respective controls and input fields. If a parameter cannot be set, for example, due to a specific setting of another parameter, its control will be grayed out.
You can save only persistent parameter settings. Settings from non-persistent camera parameters (marked with the icon ![]() ) will be lost after rebooting, reconfiguring, or disconnecting the camera. For more information about persistent and non-persistent parameters, see the topic Saving Parameters of Cameras or Peripheral Devices.
) will be lost after rebooting, reconfiguring, or disconnecting the camera. For more information about persistent and non-persistent parameters, see the topic Saving Parameters of Cameras or Peripheral Devices.
If the parameter you want to adjust is disabled or if you cannot find it, you could try if a refresh of the camera parameters helps.

A refresh also updates the parameter values that might have been changed automatically due to changes at another parameter. You can recognize which camera parameters and parameter categories have been automatically updated by a blue bullet point that is shown beside the parameter name or category name.
If you cannot find the desired parameter you want to change, you can also check the filter options for the camera parameters. The filter might be set to show only specific camera parameters instead of all of them.
Filtering the Camera Parameters
You can filter the list of camera parameters to show only relevant parameters. The filter options can be opened via the ![]() button on top of the "All Parameters" tab. The following filter categories are available: "Parameter Visibility" and "Persistence".
button on top of the "All Parameters" tab. The following filter categories are available: "Parameter Visibility" and "Persistence".
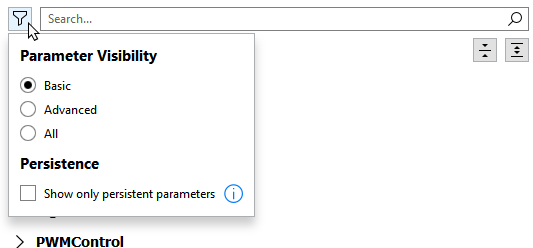
Parameter Visibility
This option filters the parameters by the frequency of their use. You can choose between three different visibility modes:
- Basic
- Advanced
- All
By default, the filter for visibility is set to "Basic". In this mode, the most commonly used parameters will be shown whereas the other two modes also show further parameters that are usually not adjusted quite as often or that are only required for rare conditions.
Persistence
This option filters for persistent camera parameters. Persistent parameters are written to file when you save the camera parameters. Therefore, their values will be restored, for example, if a camera is rebooted or reconfigured. This is not the case with non-persistent parameters, which are marked with the icon ![]() . By default, this option is not activated. This means that all parameters, including non-persistent parameters, matching the visibility filter will be shown. To see only persistent camera parameter settings, activate this filter option.
. By default, this option is not activated. This means that all parameters, including non-persistent parameters, matching the visibility filter will be shown. To see only persistent camera parameter settings, activate this filter option.
For more information about persistent and non-persistent parameters, see the topic Saving Parameters of Cameras or Peripheral Devices.
Searching for Camera Parameters
You can also use the search function to find specific camera parameters in the "All Parameters" tab.
Enter the name of the category or the parameter you are trying to find. Results will be visible as soon as you type the first letter. Only results that contain your entry and that are part of the selected visibility mode are shown. Delete your search entry by clicking ![]() on the right side of the input field.
on the right side of the input field.
If the list does not show any results, check your entry for mistakes and make sure you have chosen the visibility mode "All". If there are still no results, the parameter you are looking for does not exist for your camera device.
Display Name and Internal Name of Camera Parameters
The EasyParams in the "MVTec EasyParams" tab and the camera parameters in the "All Parameters" tabs are shown with their display name. However, the respective internal names of EasyParams and camera parameters, whose internal names are defined by the manufacturer, differ from the display names. For example, the internal name of a camera parameter might have an additional prefix or it might be the same as the display name but without spaces.
If you want to look up the internal name of a parameter, right-click on the name and copy the name via the context-menu.

