Configuring Triggers for the Image Acquisition
To enable the configuration options for a specific camera device, you have to activate the configuration in which the image source is stored. Only then it is possible to configure the camera parameters of a specific image source or to use the preview mode for its image files. After activating the configuration and selecting a camera device to configure, you can now adjust the parameters of your selected camera device, for example, the trigger mode. MERLIC supports up to three trigger modes for the image acquisition depending on the trigger: hardware, software, and free-running.
As a default, MERLIC sets a software trigger for all connected camera devices. To use a different trigger mode, you have to change the respective camera parameters manually. To do so, you can either use the MVTec EasyParams or the camera parameters in the "All Parameters" tab. The EasyParams present the most important configuration options without having to search for them. However, the camera parameters in the "All Parameters" tab allow for some additional configurations, depending on which parameters are supported by your camera device. In case the trigger mode can not be set for a camera device, the respective default values of the camera are used.
Parameters for the Trigger Mode
The trigger mode of a camera device can be set in different ways: via the "EasyParams" tab or via the "All Parameters" tab.
EasyParams for the Trigger Mode
In the "EasyParams" tab, you can set the trigger mode with the parameter "Trigger Method". It combines the parameters "Trigger Selector", "Trigger Mode" and "Trigger Source".
When selecting the trigger mode for hardware or software triggers, the trigger mode is automatically activated. When selecting the trigger method "Off", however, the trigger mode stays off.
If you would like to work with a trigger selector other than "FrameStart" (or "ExposureStart" if FrameStart is not available), you need to set both the trigger selector and the trigger mode in the "All Parameters" tab.
Parameters for the Trigger Mode in "All Parameters"
In the "All Parameters" tab, the parameters for the configuration of the trigger mode are specified in the category "AcquisitionControl".
- Set the parameter "Trigger Selector" as desired.
- Refresh the camera parameters using the
 button in the tab title.
 - Set the trigger mode via the parameters "Trigger Mode" and "Trigger Source".
It is important to set the trigger selector first because the parameters "Trigger Mode", "Trigger Source", and in some cases "Trigger Software", are bound to the selected value of the parameter "Trigger Selector". If you change the trigger selector, you change the entire configuration of this parameter combination and you have to reconfigure that as well.
Hardware Trigger
When using the hardware trigger mode, the acquisition of an image must be triggered by a trigger signal. This can be sent by a trigger device, for example, a button or a photoelectric sensor.
To use the live image view of the "Image Sources" tab in hardware trigger mode, you need to make sure that your hardware is triggering the image acquisition.
Setting the Camera Parameters for Hardware Trigger
"EasyParams" Tab
Set the EasyParam "Trigger Method" to the desired hardware trigger, for example, "Line1".

You can only choose hardware triggers of the type "Line<x>". If you would like to work with a different kind of hardware trigger you need to configure the hardware trigger in the "All Parameters" tab.
"All Parameters" Tab
- Select the trigger type in the parameter "Trigger Selector".
- Set the "Trigger Mode" to "On".
- Set the parameter "Trigger Source" to the pin, that is, the physical input line, that has been configured for the hardware trigger. The correct value of "Trigger Source" might differ for each camera device and the trigger device depending on the available connectors and their setup. For more information about the appropriate connectors, see the documentation of the respective camera and trigger device.
The following image shows an example configuration for hardware trigger. In this example, the "Trigger Source" is set to "Line1" which means that this trigger type is configured for hardware trigger. Therefore, the trigger device must be connected to the respective pin of "Line1".

Timeout for Hardware Trigger Signal
When running the MVApp, a hardware trigger signal must be sent before the timeout duration is reached. Otherwise the image acquisition will time out. By default, the timeout duration is 5 seconds. It can be adjusted by setting the parameter "Grab Timeout" in the category "HALCON Interface".
Handling of Missed Triggers
Some camera devices support "FrameTriggerMissed" events. This event indicates that the camera device received a trigger signal which could not be processed, for example, because it was still exposing an image of a previous trigger signal. If the camera device sends a "FrameTriggerMissed" event, the Image Source Manager (ISM) logs a warning. If the event occurs in MERLIC RTE mode while the system is in the "Ready" state or in either of the execution states, an "Error" event is emitted.
Handling of Dropped Images
In some cases, an image that was acquired by the camera might be lost, for example, when the image buffer capacity is exceeded because the images were acquired faster than they could be processed. This means that the image is lost and cannot be processed.
If such a frame drop occurs when using a hardware triggered camera, the Image Source tool in MERLIC Creator produces an error image and a warning in the tool state. The respective frame ID gap is closed to maintain the correspondence between external trigger signals and the processing results. In MERLIC RTE mode, the processing step will be skipped for the dropped image but a corresponding result will be emitted with result state "Failed", along with an "Error" event.
Software Trigger
When using the software trigger mode, the trigger signals can be initiated by MERLIC Creator, MERLIC Frontend, MERLIC RTE, or a communication plug-in.
To use the live image view of the "Image Sources" tab in software trigger mode, you need to set the camera parameters as described below.
Setting the Camera Parameters for Software Trigger
"EasyParams" Tab
Set the EasyParam "Trigger Method" to "Software".

"All Parameters" Tab
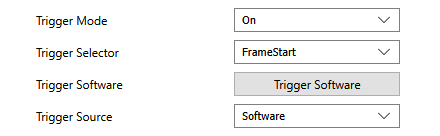
- Select the trigger type in the parameter "Trigger Selector".
- Set the "Trigger Mode" to "On".
- Set the parameter "Trigger Source" to "Software".
Handling of Dropped Images
In some cases, an image that was acquired by the camera might be lost, for example, when the image buffer capacity is exceeded because the images were acquired faster than they could be processed. This means that the image is lost and cannot be processed.
When using a software triggered camera, each acquired image should always be preceded by exactly one trigger. A dropped image indicates a severe misconfiguration of the software trigger and is therefore treated as an error. In MERLIC RTE mode, the current job will be stopped and MERLIC changes to the "Error" state. In this state, you can review the image source configuration and adjust the settings.
Free-Running Mode
In free-running mode, images are acquired as fast as possible. The camera does not wait for any trigger signal.
Setting the Camera Parameters for Free-Running Mode
"EasyParams" Tab
Set the EasyParam "Trigger Method" to "Off".

"All Parameters" Tab
Set the parameter "Trigger Mode" to "Off".

Handling of Dropped Images
In some cases, an image that was acquired by the camera might be lost, for example, when the image buffer capacity is exceeded because the images were acquired faster than they could be processed. This means that the image is lost and cannot be processed.
When using a camera in free-running mode, it is not unusual that images are dropped because the camera acquires images as fast as it can. If the image processing cannot keep up, images are dropped. Therefore, the resulting gaps in the frame ID are ignored and the next available image is processed.

