Adding and Deleting Tools
There are several ways to add and delete MERLIC tools.
As soon as a tool has been added, it is automatically selected within the Tool Flow panel and it is instantly displayed in the Tool Workspace. Image data connectors of a newly added tool will automatically determine suitable connections to the previous tools, but they can also be changed manually. When deleting a tool, all connections from and to the deleted tool will be automatically removed. If there is an empty row or column after deleting the tool, it is automatically removed.
For more information about how to connect and configure tools, see the topics Working with Connections and Configuring Tools.
Adding Tools
Adding a Tool from the Tool Library
The Tool Library lists all available MERLIC tools as well as the available custom tools. You can use the search functionality to quickly navigate to the desired tool and add the tool using one of the methods described below. For more information about the Tool Library, see the topic Tool Library.
Using Double-Click
Double-click on the tool in the Tool Library. The tool will be inserted below the currently selected tool in the Tool Flow panel.
Using Drag and Drop
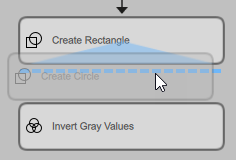
Drag the tool from the Tool Library to the Tool Flow panel and drop it at the desired position. While dragging the tool, a rectangle in dashed lines indicates the position where the tool would be placed when dropping the tool.
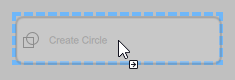
It is also possible to insert a tool between two directly adjacent tools in the Tool Flow. MERLIC automatically adds a new row or column to make space for the new tool if required. In the example images below, the new tool would be inserted in both cases between the two existing tools.

Using Keyboard Shortcuts
Select the tool in the Tool Library and press the Enter or Space key to add the tool.
If a tool is currently in focus in the Tool Flow panel, the new tool will be inserted below the focus tool. If no tool is in focus, the new tool will be inserted at the bottom of the Tool Flow.
Adding a Tool in the Tool Flow Panel
- Right-click on the position where you want to add the tool to open the context menu.
- Click on the menu entry "
 Insert tool" to show the list of available tools.
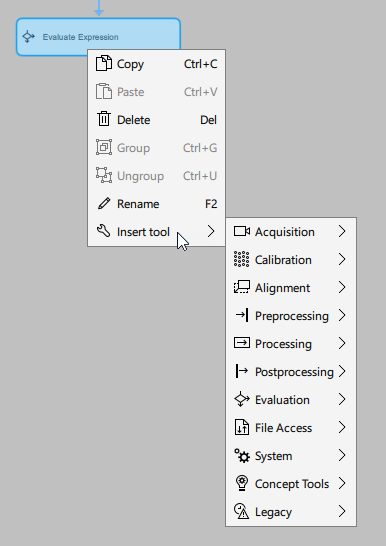
- Select the desired tool from the list and add it with a left-click.
The new tool will be inserted at the position of the mouse pointer at the time context menu was opened.
Adding a Tool by Copy and Paste
In some cases it might be faster to simply copy a tool or multiple tools in the Tool Flow panel instead of configuring them from scratch. It is also possible to copy tools from one MERLIC instance to an other MERLIC instance if you want to use the same tools in a new or different MVApp. You can copy a tool in the Tool Flow panel via the context menu or by using keyboard shortcuts.
Using the Context Menu
- Select the tool in the Tool Flow panel, either by clicking on them or selecting them with the mouse.
- Right-click on the tool to open the context menu and select "Copy".
- Right-click on the position where you want to add the tool to open the context menu.
- Select "Paste" to insert the tool at the current mouse position.
Using Keyboard Shortcuts
- Select the tool in the Tool Flow panel, either by clicking on them or selecting them with the mouse.
- Copy the tool with the keyboard shortcut Ctrl+C.
- Paste the tool with the keyboard shortcut Ctrl+V.
- Move the mouse pointer to the position where you want to add the tool and confirm it with a left-click.
It is also possible to paste a tool between two directly adjacent tools in the Tool Flow. MERLIC automatically adds a new row or column to make space for the new tool if required. If multiple tools are copied, the connections between these tools will also be copied. However, connections to other tools will be lost because they are not copied.
Deleting Tools
Deleting a Tool in the Tool Flow Panel
There are several ways to delete a tool in the Tool Flow panel.
Using the Context Menu
Right-click on the tool in the Tool Flow panel and select "Delete" from the context menu.
Using Keyboard Shortcuts
Select the tool in the Tool Flow panel and press the Del key.
Deleting a Tool in the Tool Workspace
This option is useful if the tool to be deleted is already selected and displayed in the Tool Workspace.
Click the ![]() button at the top right of the Tool Board.
button at the top right of the Tool Board.

