Deep learning technologies allow a wide range of applications for machine vision. Based on these technologies, MVTec offers various operators and tools within HALCON and MERLIC – often in combination with embedded boards and platforms (more information about this can be found in our section about Embedded Vision).
In this article, we describe how to train a deep learning classifier with HALCON on a standard PC together with the embedded board NVIDIA Jetson TX2 and a Basler GigEVision camera.
Prerequisites
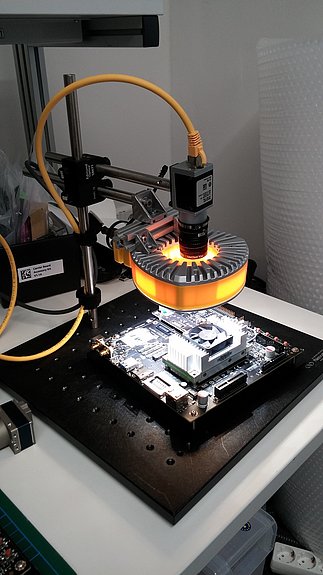
Therefore, we set up the following technical components:
- Standard PC with a powerful NVIDIA GPU with HALCON 17.12 installation or above.
- System with a NVIDIA GPU with HALCON 17.12 installation or above (we used NVIDIA Jetson TX2 + power supply and HALCON 17.12 for Arm-based x64 systems).
- 2 HALCON dongles (dependent upon you want to switch the dongles between the systems)
To setup a live system – and not working only with offline images – you additionally need the items below. You can see within the brackets, what we used.
- GigEVision camera (Basler ace acA1300-30gc ICX445)
- Lens (6mm, V.S. Technologies SV-0614 (B1211), 0.5mm distance ring, polarizing filter to avoid specular reflections)
- Lighting setup (EFFI-Ring including polarizing filter to avoid specular reflections)
- Stativ system (Newport opto-mechanical mounting sets)
- Additional parts for identification (NVIDIA Jetson TX2, Raspberry Pi 3, background and our hands)
For a comfortable handling we applied a switch for connecting the camera to the PC and the NVIDIA Jetson. Otherwise you have to plug and unplug the camera in between the systems. If you don’t want to use an external power supply for the camera, you need a PoE-camera and an active switch.
Acquiring the images
Starting from scratch, using deep learning technologies requires millions of images. With HALCON’s pretrained deep learning nets, only around 400 images per class are required. For speedy and easy acquisition of the data, we developed a simple recording script, which can be downloaded on this site. Please note that for the execution of this script, some external procedures are needed. You may find them in the complete download package at the end of this site.
If you press your mouse button down, the images grabbed from the camera are stored on the HDD in the correct folder structure ( ./images/XXXX/imgNNNN, where XXXX is the name of the class and NNNN the sequence number). You may configure the script to fit your objects you would like to distinguish.
Please make sure, you have Jumbo Frames activated for your network interface card where the camera is connected. On Linux-based systems, you may doing so by typing: udo ifconfig eth0 mtu 1492
Rules for acquiring the images:
- Make sure that the object covers most of the image. This is especially important if you have the background as a class.
- The classifier uses – if you do not preprocess the images – the complete image content including the background as well. Therefore, you should make sure, that the object itself covers a larger portion of the images. Otherwise the classifier may train the background and not the appearance of the object.
- Provide every perspective of the object that may occur in the target application.
- Check if the objects are distinguishable on the target size of 224x224. If this is not the case, you may think about dissecting your image in smaller portions and performing the inference on them. Doing so, you need to combine the single decisions to a final one.
For our system, we performed the acquisition of the training images on the PC, since the training itself is also performed here. Basically, it does not matter if the acquisition takes place on the embedded board or the PC, as long as the same setup is used for training as for the live inference of the net. But of course, the data can be acquired on the embedded board and transferred to the PC afterwards for the next step. Please note: For easier operation, the script crops the images shown in the live view to the space without the red overlay.
Please note: For easier operation, the script crops the images shown in the live view to the space without the red overlay.
Train the model
Basically, the training can be done on both platforms. However, we highly recommend to do it on the more performant system (PC in our case) since the training may take some time depending on the configuration, e.g. the used batch size, and the used hardware. The script reads the training images and prepares them for the training, which is mostly resizing the image to 225x225. It is also possible to automatically vary the given training set by a process called augmentation. The corresponding convenience procedure augment_images may automatically alter the image content by rotation, cropping, mirroring and local or global brightness variation.
The process of the training can be checked by the graphics provided by the script. The values for training and validation error should start at a high value and lower during the iterations. After the training converges, the classifier is written to disk in order to transfer it to the target platform if necessary.
Transfer the model
The *.hdl file created by the script in the previous step can be transferred from the PC to the Jetson TX2. This can be done comfortably using a network connection and a transfer software like WinSCP or by simply using a USB-Stick.
Perform the inference
After all previous steps are completed, the system is ready to use. The last script is pretty straightforward – it grabs images from the camera, applies the deep learning net and show the results. The output should look similar to the output of the acquisition script besides the inference result.
For easier handling, you may use a SSH client like PuTTY. This allows to shows the output of the Jetson on the PC. Please make sure you enabled X11 forwarding and started an X-server on the PC to display the graphical output of the script on your remote platform. Furthermore, make sure you activate the high-performance mode of the Jetson. On the development system we used, the script jetson_clocks.sh can be executed to use all available cores. If this is activated, you should see the CPU fan rotating.


